Sunday, April 26, 2009
who won?
the contest is over! thanks so much to the 31 people who responded...i think red velvet was the overall favorite upon first glance. i appreciate all of the kind words - you all are so sweet :)
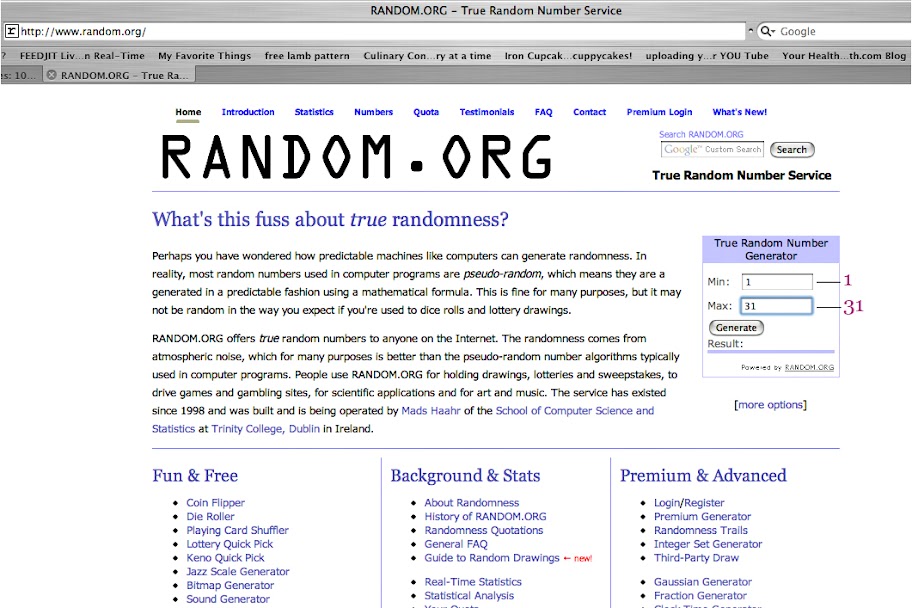
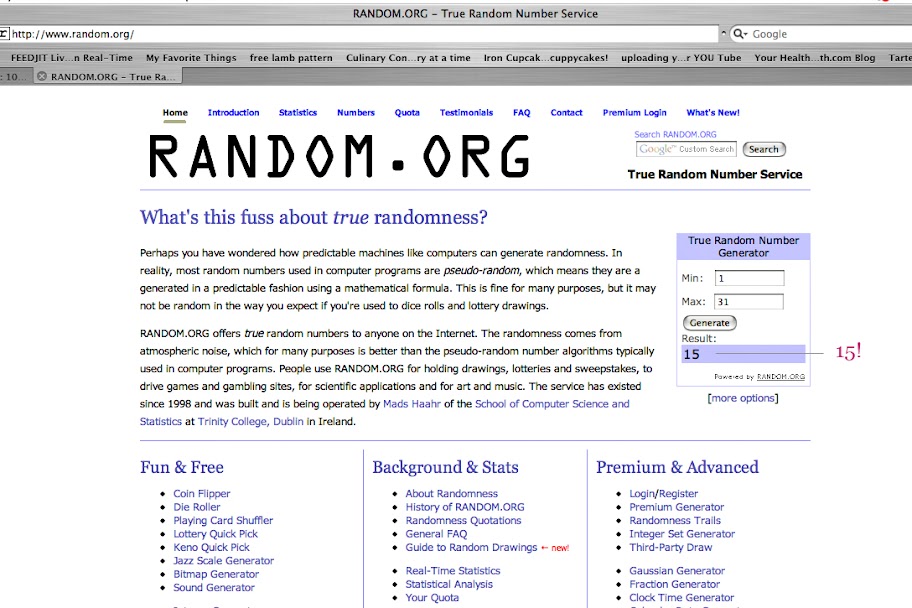
now...to the winner! i plugged in the 31 entries into the random.org number generator and:
now...to the winner! i plugged in the 31 entries into the random.org number generator and:

congrats to kelsey from apple a day! she loves red velvet, like so many of you...i hope she loves the package of goodies just as much :) kelsey, please email me at alaunapeterson at gmail dot com to let me know what color magnet set you'd like and where i can ship the prize to.
thank you again, everyone, for entering and for reading my blog. i hope you'll continue to stop by! here's to 100 more posts (picture glass of white sangria in my hand, raised to whatever it is you've got).
Thursday, April 23, 2009
win me!
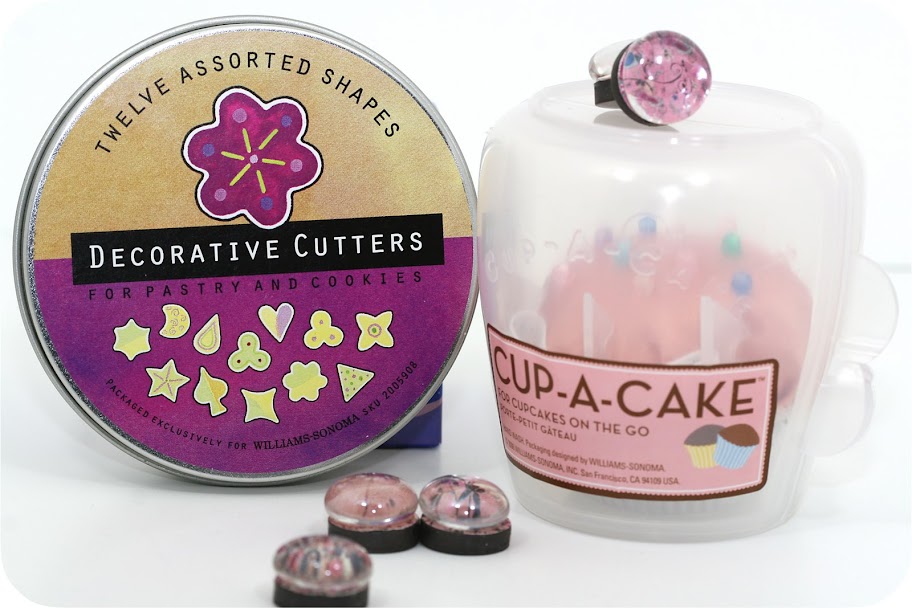
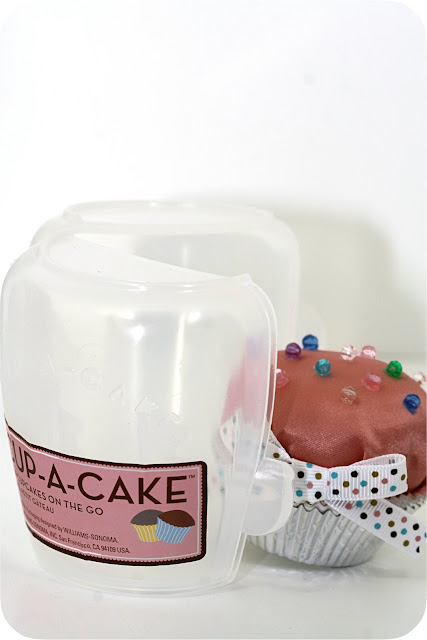
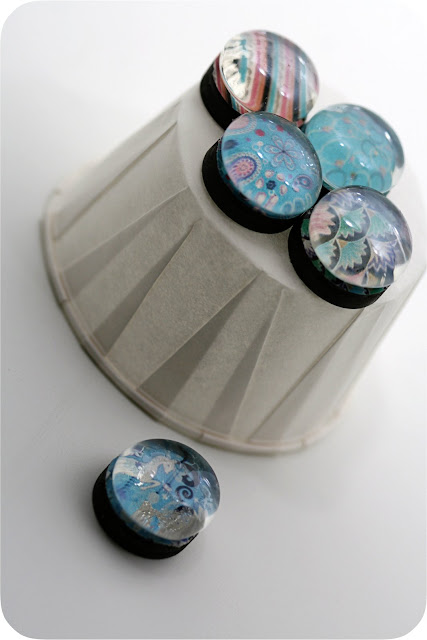
you read right...this is my 100th blog post! i was so excited to see the numbers creeping up, i decided to share the fun and give something away to my readers. i know of at least a handful of people checking my blog fairly often...and i see those of you just popping in and out...everyone is welcome!
this fun little set of goodies is part handmade (this is things alauna makes, after all!) and part unique yet useful premade items. keep reading for what's to win and how to win it.
this fun little set of goodies is part handmade (this is things alauna makes, after all!) and part unique yet useful premade items. keep reading for what's to win and how to win it.
what to win:
a set of 6 handmade marble magnets (your color choice!)
cup-a-cake single cupcake carrier
fabric cupcake for example purposes ;)
set of 12 miniature cookie cutters
how to win:
leave a comment telling me your favorite cupcake flavor...one you couldn't resist eating
1 (one) winner will be picked using random.org number generator
i'll announce the winner here and you'll email me what color magnets you'd like
i'll ship* everything off for you to enjoy!
deadline & rules:
the contest will end on sunday, april 26, 2009 at 5 pm eastern
1 entry per person & you must enter a name/identity (anonymous posts cannot win)
*this contest if for US residents only; sorry to international readers...i know you're out there and i appreciate you!

win me!
it's so much fun and who wouldn't want to get this package in the mail? i hope you'll enter.
good luck and stick around for the next 100 posts!
good luck and stick around for the next 100 posts!
Tuesday, April 21, 2009
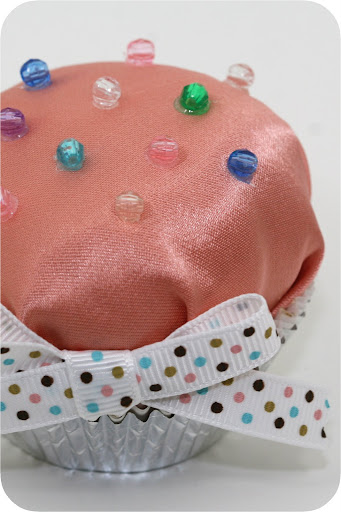

beaded satin "cupcake"
this was totally random and silly, but part of something better. stay tuned for my next post which promises to be a good one, i think.
wondering how i made this mini little cupcake? here's the instructions:
1. cut a circle disc from card stock that fits inside a cupcake liner
2. cut a small "x" into the center of the circle
3. cut a circle from fabric that is 2 inches larger than the paper disc
4. lay the fabric circle face down (this is your top) and put the paper circle on top of it
5. using hot glue, attach the fabric to the edge of the disc at 12, 3, 6, and 9 (like a clock!)
6. continue gluing between the halfway points until fabric is neatly tucked and secure (1.5, 4.5, 7.5, 10.5 then halfway between those dots...you with me?)
7. gently push stuffing into the cupcake "frosting" through the "x" cut out until full
8. glue 3 or 4 paper liners together, then glue inside the silver (or outer) liner
9. glue a small amount of stuffing to the inside of the liners
11. top with beads or sequins and add a decorative bow if you feel like it
it's pretty easy and i managed to get this mini cupcake after only two trial and error versions. i don't know what you'd use it for...but i know what mine's doing. check back for details!!
Saturday, April 18, 2009

blood orange in light box
as promised in my previous post, here are the photos from my first light box photo shoot. i picked random items in my house to take picture in the new "studio" and edited slightly in photoshop (some more than others, you'll see).


a $5.99 vase husband picked out from walmart the day they lied about stocking embroidery floss. it's surprisingly cool and has great detail in the wood. who knew?
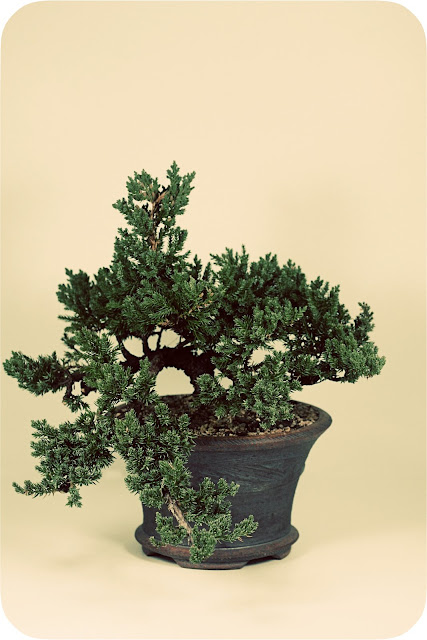
Juniperous procumbens 'Nana' (using caps at husbands request for formal name) husband, if i haven't mentioned it, likes plants. mostly he likes small trees and one of his hobbies for the past 10 years or so has been bonsai. the tree above is one of a billion in my house.
here i ran pioneer woman's seventies action (i'm pretty sure). this kind of defeats the white background, but i like it. 70s vibe indeed. same tree as above.


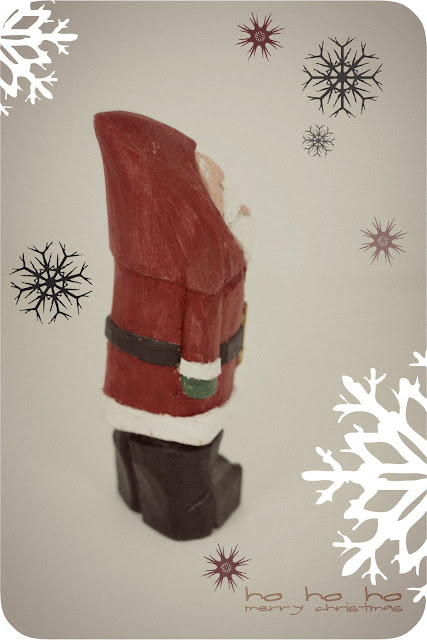
my father-in-law made this santa for me (i think just me...maybe husband and me). he learned how to carve wood and this was his very first piece. it's hand carved and hand painted and i really love it. it came out great in the studio.
so i made up this little card and sent it to him. i mean, i know it's april...but this is still super cute. next year! i used random photoshop actions probably from the pioneer woman.
then i had a photo shoot with the dogs. i took out the base foam core so their nails wouldn't pierce it and used a white sheet instead. it took some coaxing, especially for the scaredy baby, but with some peanut butter training bites, both happily sat in the little white box.


hoss and miles
i like these. hoss (blue eye) did, too. in fact, he liked it so much i came back into the room two hours later to find him curled up inside the light box. the lamps were off, but he didn't care. as i watched tv, he would every so often poke his nose out, sniffing for peanut butter treats. well trained! i would show you a picture but my stupid rounded corners action is giving me trouble. i love that action, though (from coffeeshop), so i'm just ranting a tiny bit.
i've got food photos from the light box as well. my next few recipes will include closeups from the new studio. in all, i'd say this makes getting a clean white background pretty simple and does provide with an even, well lit area to take photos.
Friday, April 17, 2009
highly technical and professional photo studio
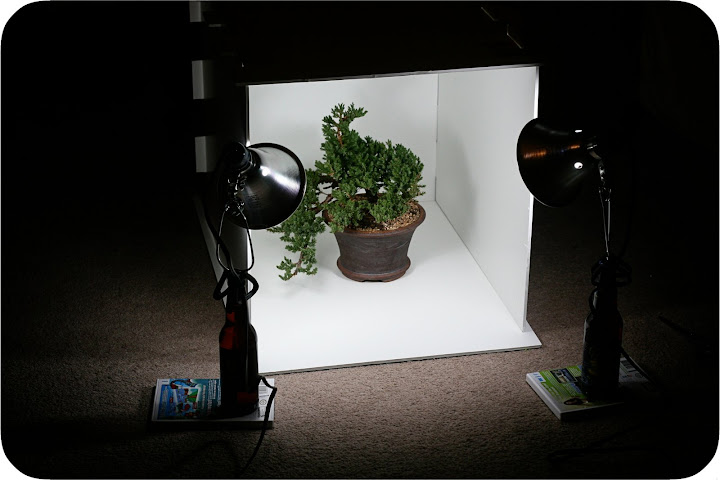
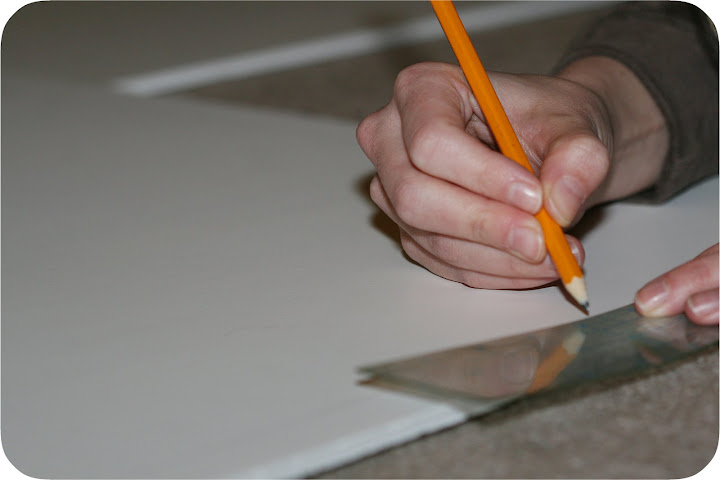
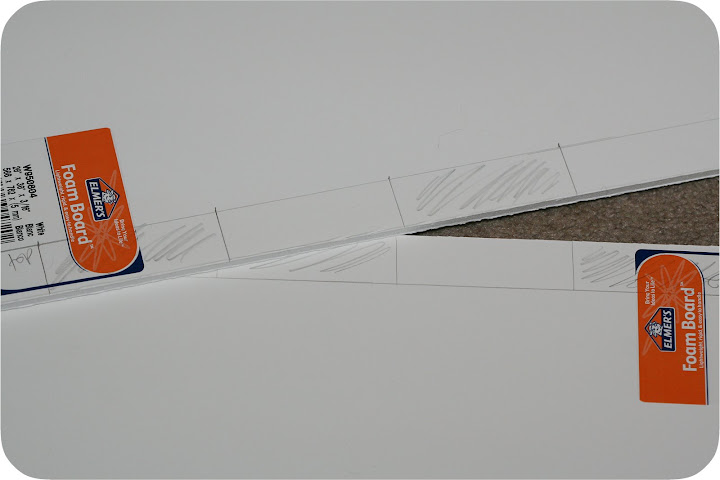
i've been thinking about buying some sort of studio stuff to make my pictures look better. but i barely know how to use my camera off the auto setting, so i wasn't sure spending money on collapsible sets, flashes, soft boxes and whatever else was the best way to go about getting better pictures. so i changed my plans. step one: learn more about photography. i'm working on that part. it's a slow process. step two: make a homemade light box and see if it helps.
i searched around and found plenty of cardboard boxes with sheets, duct taped squares, and large pieces of white paper...and then i found this tutorial from drawings in motion for a simple, collapsible light box that seemed pretty inexpensive and easy to do.
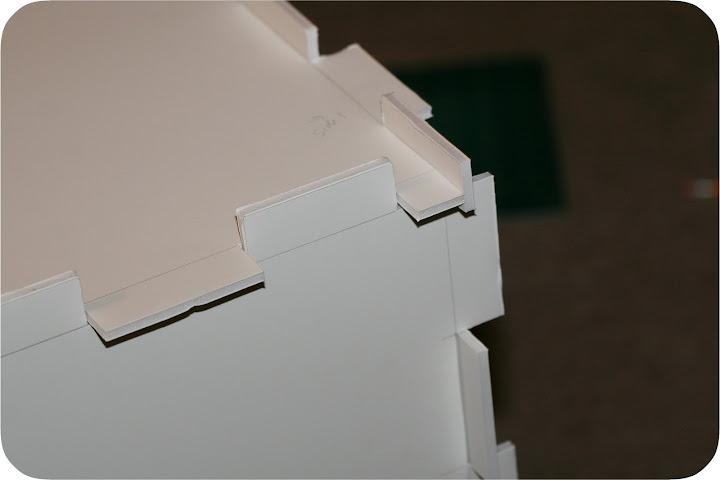
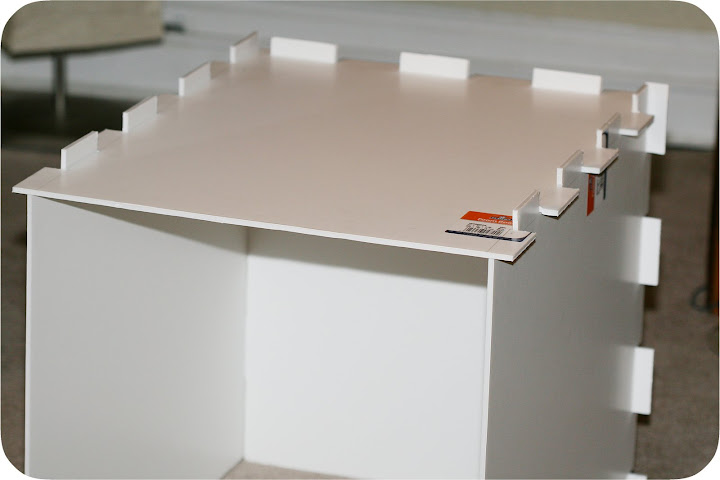
making a light box
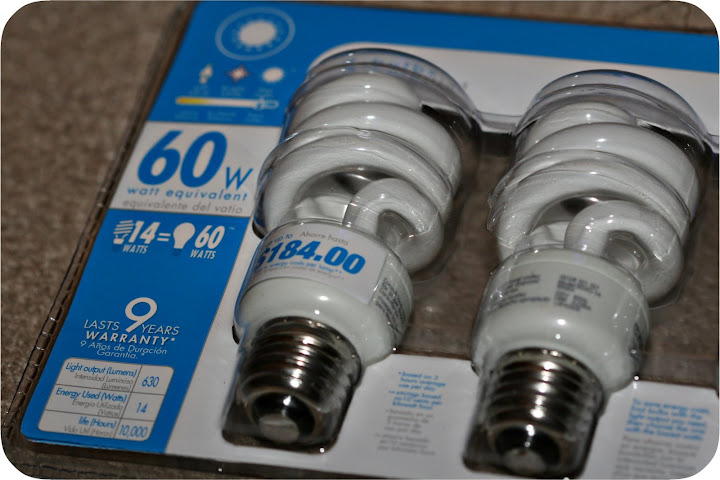
i was right...it wasn't that hard. i'm a visual person who needs actual objects and hands-on learning to understand concepts (this is my problem with photography from a booklet), so laying out the pieces and seeing them fit together helped. her instructions are easy to follow, so use them. my only change was to exclude the white tag/poster board backdrop. mine also cost a bit more - foam core was $2.99 each (5 pieces), and i went ahead and purchased daylight bulbs and basic lights from home depot. i think i spent around $25 total, but i already had things like exacto knives, ruler, and a cutting mat.
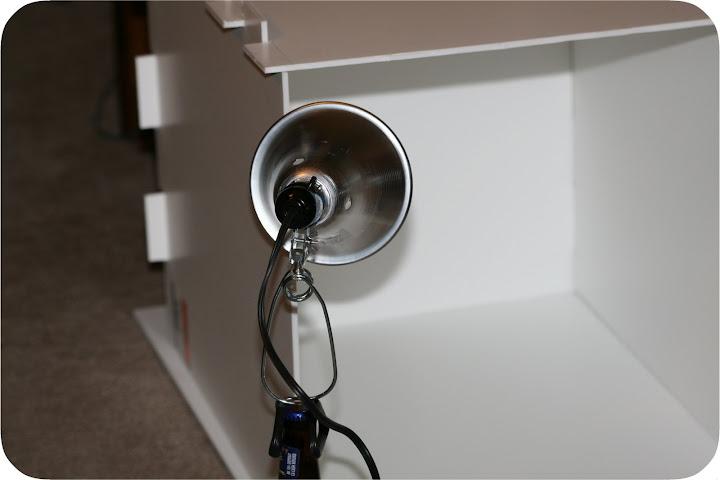
lights!
once the notches were cut, i put everything together and set up the lighting. while the lights do have clips, they were too heavy for the foam core, so i used glass beer bottles. those bottles were tipsy, so i set them on wii games. this is serious stuff. for whatever reason, i've been using this studio on the floor, so this is my standard set up. it allows you to manipulate the lights and change the angles without damaging the actual box. i might move up to a table one of these days and see if i makes it easier.
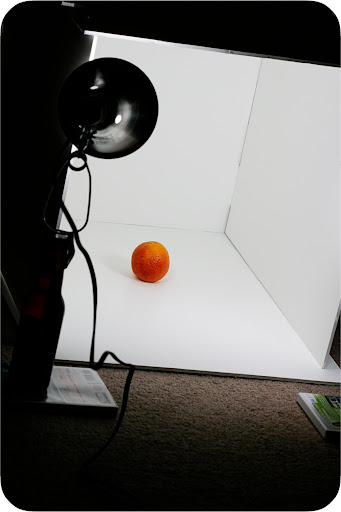
my first subject
for my first photo from the light box, i went to the kitchen to find a subject. hmm, i mentioned that i have a thing for blood oranges, right? yes, ok. so i got down on the floor and started snapping. and huh, that homemade light box thing makes quite the difference. no, i don't have it perfect. yes, i use photoshop to clean things up. but the sooc photos are much improved!
and the best thing is that i can put this together and take it apart whenever, so it doesn't clutter the table or floor like some of the more permanent boxes. plus, i can take pictures whenever i want no matter what the natural lighting conditions are. and trust me, even in prime daylight hours my kitchen gives me just barely enough.
in my next post, i'll show the photos from this first shoot. you can also see the results in my post about the scotty key chains - the close ups were taken in this lightbox.
Wednesday, April 15, 2009
up and coming staple
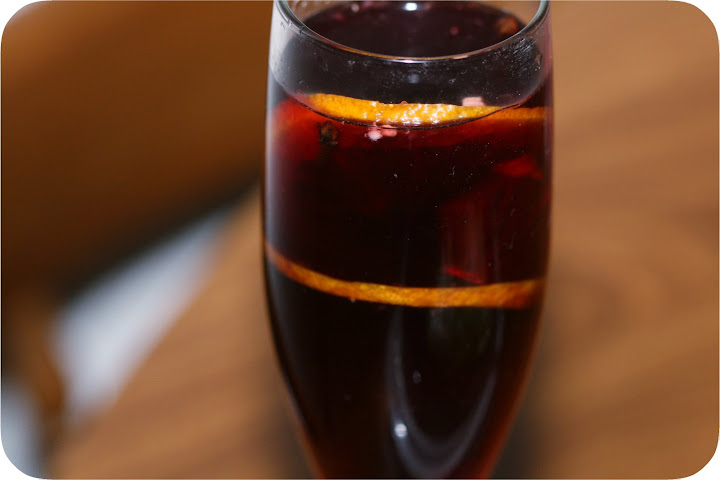
did you know i have a thing for champagne? not the real champagne (though i've had some yummy stuff at husband's uncle's reception in london in which friends of the family hopped on over to france to pick up a few 100 custom bottles for them...), but i do like the sweet, sparkling wines of the world. i tend to pop one open on a saturday morning for mimosas only to have no idea how i'll finish it. husband's not that into the bubbly and there is no reason for me to be imbibing solo whenever the heck i want.
this sangria adaptation comes from the "need" to use half a bottle of champagne and my other current obsession: blood oranges. i look forward to blood orange season every year. this year, TJs had 2lb bags for $2.99 and i bought 2 bags at a time for a few weeks. so i had blood oranges and champagne and quite the conundrum.
this sangria adaptation comes from the "need" to use half a bottle of champagne and my other current obsession: blood oranges. i look forward to blood orange season every year. this year, TJs had 2lb bags for $2.99 and i bought 2 bags at a time for a few weeks. so i had blood oranges and champagne and quite the conundrum.
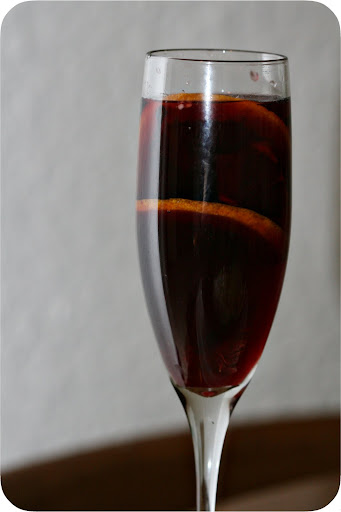
but then husband opened a bottle of red to go with dinner and i had myself a little brainstorming session filled with inspiration. this is a quick and easy "sangria" (i use the term loosely because i'm not sure it's entirely correct to call this a true sangria) that you can manipulate to include what you've got on hand.
blood orange sangria
juice of 3-4 blood oranges
2 blood oranges, sliced thinly
about half a bottle of champagne ;)
2 -3 c red wine (husband opened a syrah)
1/4 c sugar
5-10 whole cloves
2-3 cinnamon sticks
combine all ingredients (you can grate a bit the cinnamon, too) in a pitcher and allow to sit. the longer the better, but i was on a self-imposed quick turnaround time and this tasted good enough for me after only 1 hour. i tasted initially and adjusted a bit, because i tend to like the flavor of orange juice, champagne, and sugar more than a strong wine flavor...but i imagine many people would prefer the opposite.
this was so yummy - the blood orange is much better than a plain old navel and the warm spices are great with wine and bubbly. stone fruits and apples would be excellent additions, if you so happened to have them. i bet it would have been even better if i'd had the patience to let it sit for 5 hours or more. next time!
Sunday, April 12, 2009
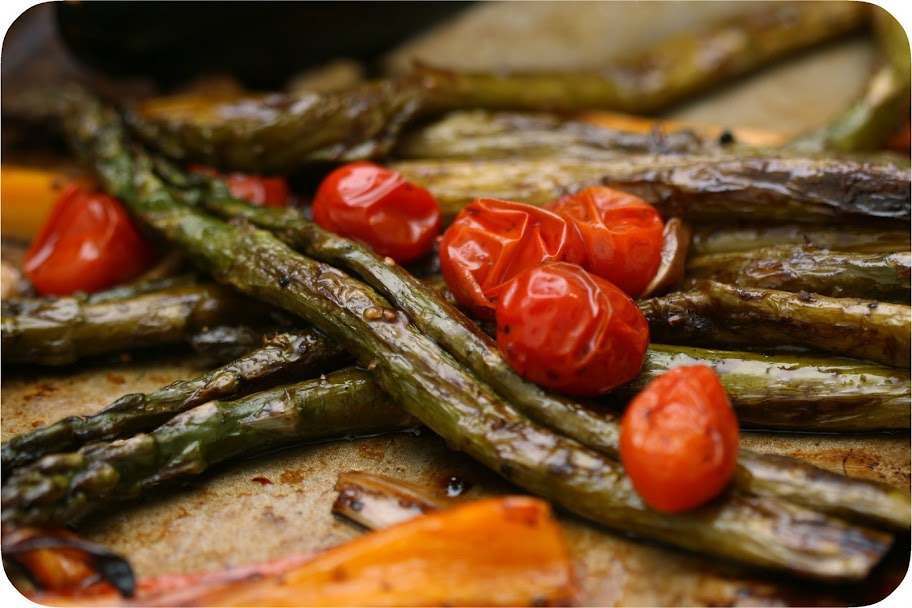
things that are roasted at 400, alex.
this was a quick veggie side dish for easter dinner a day early while my mom was in town. lucky for me, i had mom in town for a whole week + two days and we had so much fun. but she left on easter sunday and i wanted to be sure we had a good dinner in before she flew back home.
of course we had plans for ham and potatoes (two kinds, because mom and i do not like au gratin and husband specifically requested them), but we needed a basic veggie to keep the balance. i had a costco bag of asparagus and one of baby peppers and couldn't imagine a more fabulously easy side than roasting them with some blasamic vinegar.
of course we had plans for ham and potatoes (two kinds, because mom and i do not like au gratin and husband specifically requested them), but we needed a basic veggie to keep the balance. i had a costco bag of asparagus and one of baby peppers and couldn't imagine a more fabulously easy side than roasting them with some blasamic vinegar.
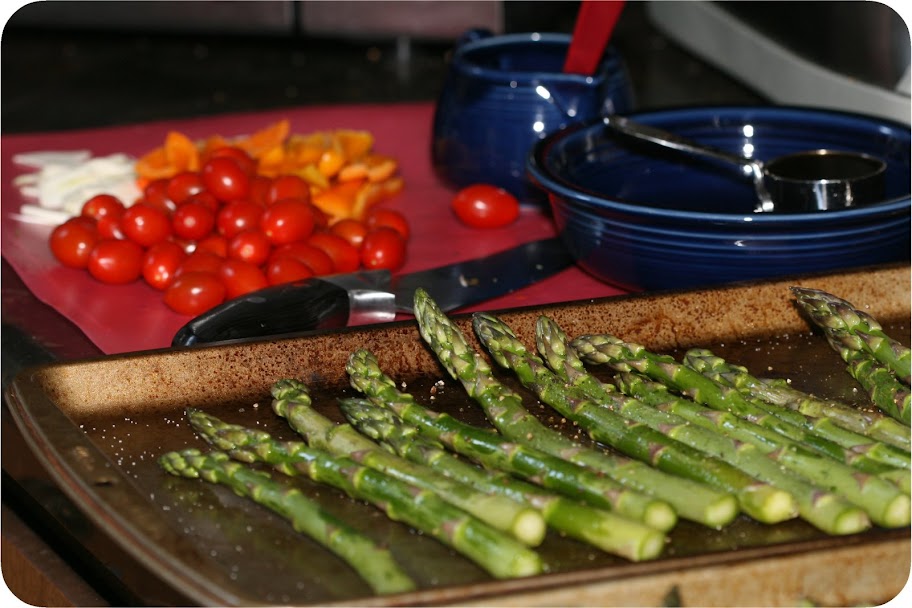
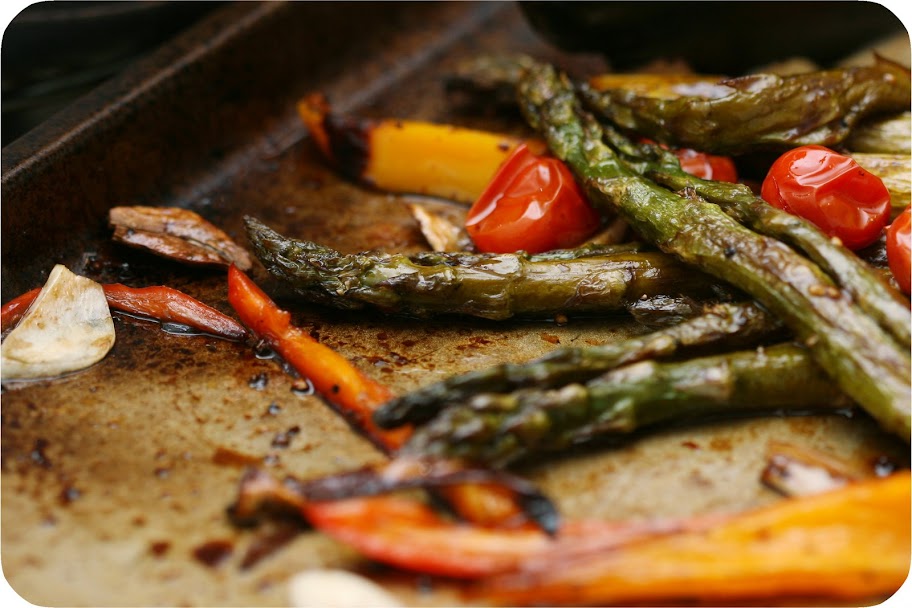
from raw to roasted in 20 minutes
so thats what i did! here's the no frills "recipe"...
balsamic roasted asparagus
asparagus (amount to your liking)
2 cloves garlic, sliced
bell peppers, sliced (i used about 5 baby ones)
cherry or grape tomatoes (handful)
olive oil
salt and pepper
balsamic veingar
1. toss asparagus in oil, salt, and pepper and lay flat on a roasting pan
2. put in 400F oven for about 10 minutes, turning once
3. add in garlic, peppers, and tomatoes (tossed in oil) and roast for an additional 10 minutes
4. splash with balsamic vinegar and cook for 2-3 more minutes to sweeten
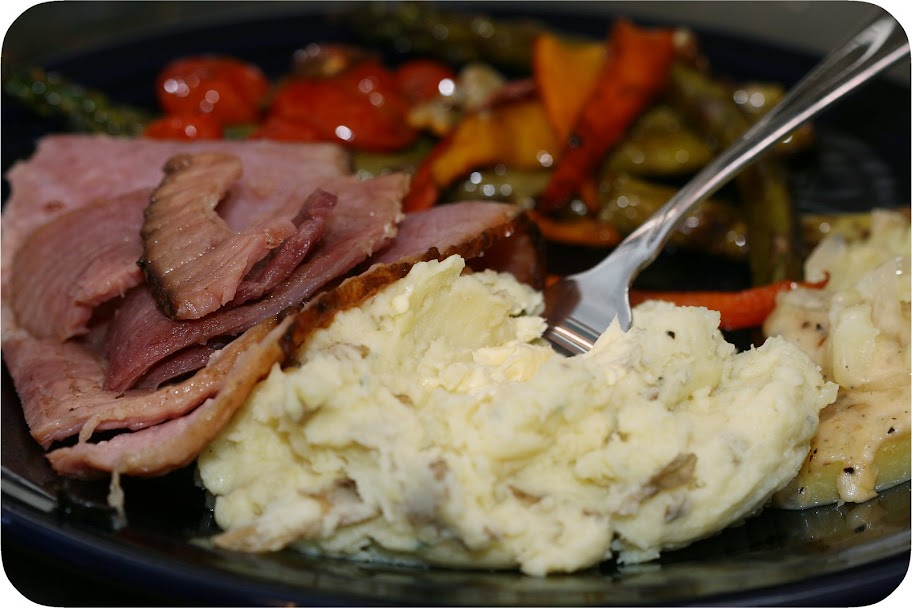
easter dinner!
mmm, this was so tasty. basic mashed potatoes, au gratin potatoes, glazed ham, and roasted goodness. i was also surprised by how good the ham turned out because i used a new glaze recipe. if you're one of those people that eats ham on days other than easter (which i guess i'm really not), then here's a glaze to try:
1/2 c marsala wine
1/4 c brown sugar
2-3 tbsp honey
dash of all spice
dash of ground cloves
1. heat all ingredients in a small pan and simmer until reduced, about 8 minutes
2. drizzle half over ham before cooking and again mid-way through
this was good the first time around and even better when used as leftovers in ham and bean soup. why now do i not eat ham more often? and how did this post get to be about ham? asparagus!
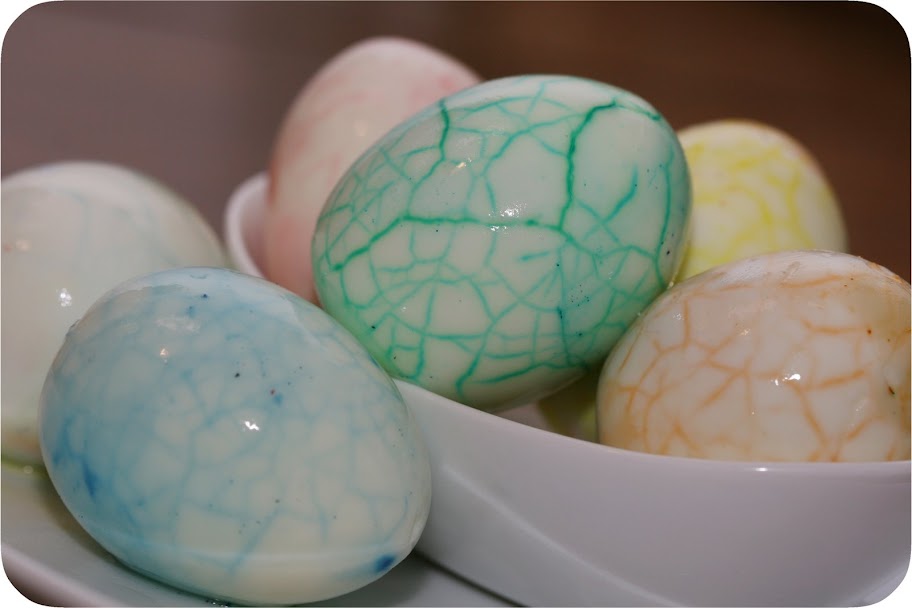
crackled eggs
i didn't know there were multiple ways of dyeing eggs outside of the variety of boxed sets available. i just assumed that either you used straight food coloring on the shells or you bought a box of paas. white crayons for personalizing was about as creative as it got. then i browsed the interwebs pre-easter and my eyes were opened...wide. tea, ties, spices, over shell, under shell...there's a whole world of natural, toxic and/or weird ways to color eggs. in browsing tastespotting, i saw a beautiful picture of tea eggs (crackled and dyed a lovely brown from tea leaves) from the barefoot kitchen witch. upon visiting her site, i saw the colored version and fell head over heels for these eggs.

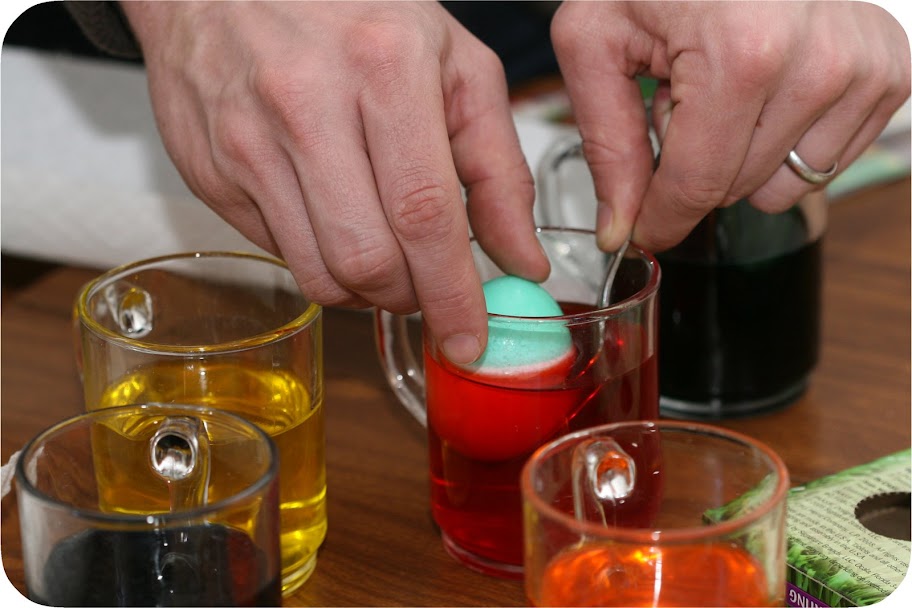
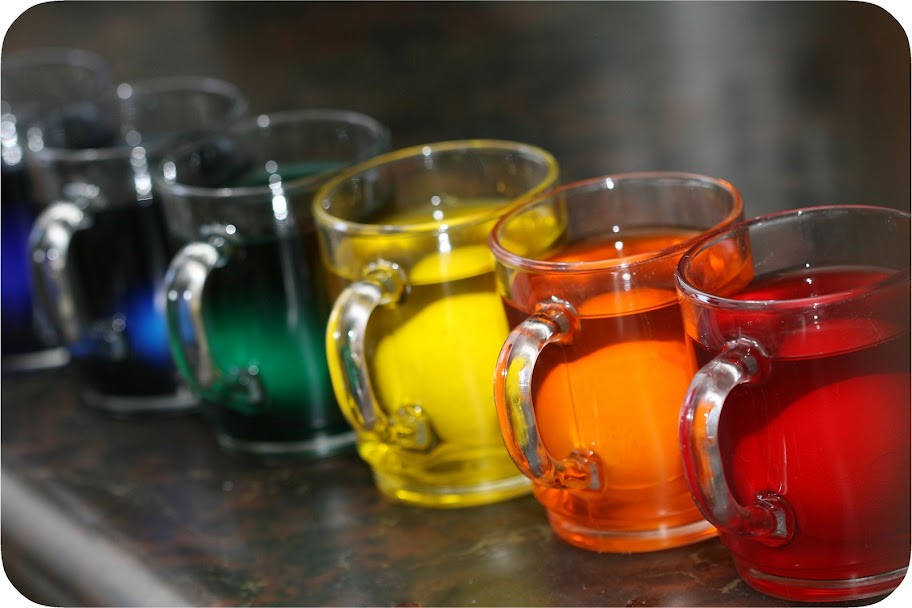
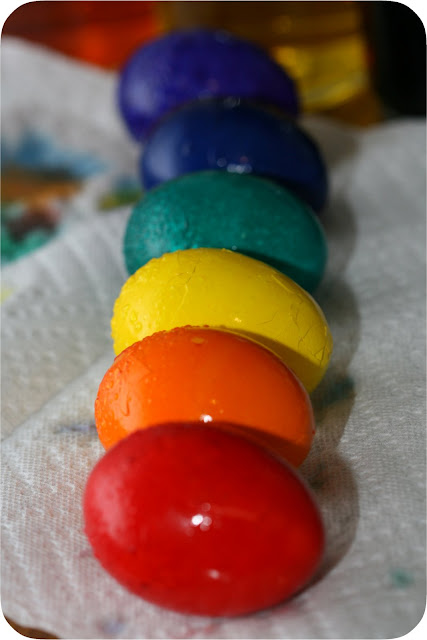
we started with the traditional egg dyeing. 6 hard boiled eggs dunked in cups of color for varying times. husband was most proud of his christmas egg, pictured in the middle. mom got ahead of herself when she dropped her rainbow egg onto the table, where it rolled onto the floor and was briefly chased by two small dogsons (blurry picture on right).
so we took this as our cue to crack the last 6 of the dozen. ever so carefully, i rolled my two back and forth, creating tiny cracks in the shell. husband not so carefully smashed his around and i believe mom fell somewhere in the middle (without dropping any more on the floor). we each dropped our eggs into the six dye cups and i put them in the fridge for about seven hours.
rainbow easter tradition
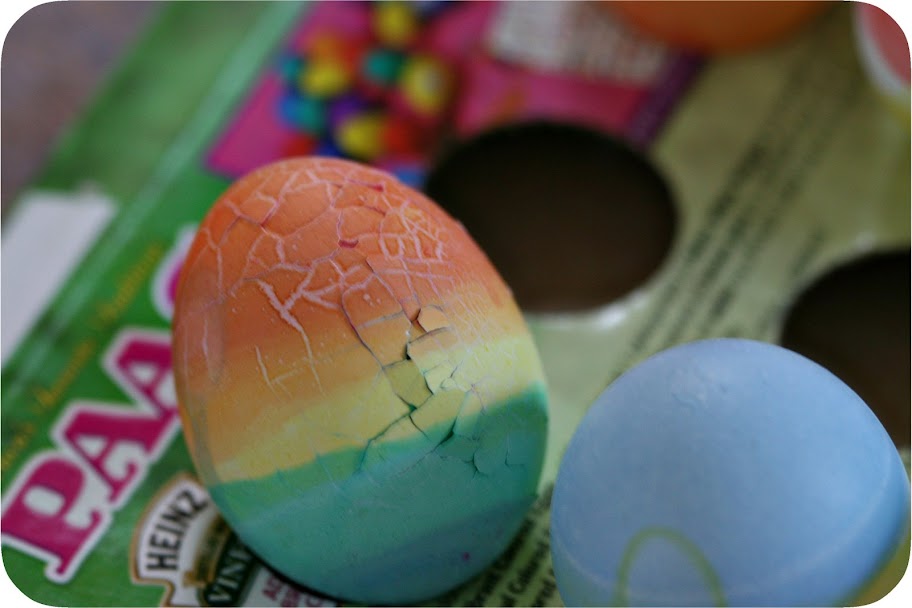
the eggs seemed dark and vibrant on the outside...but we still had no idea if this cracking business was going to work on the inside.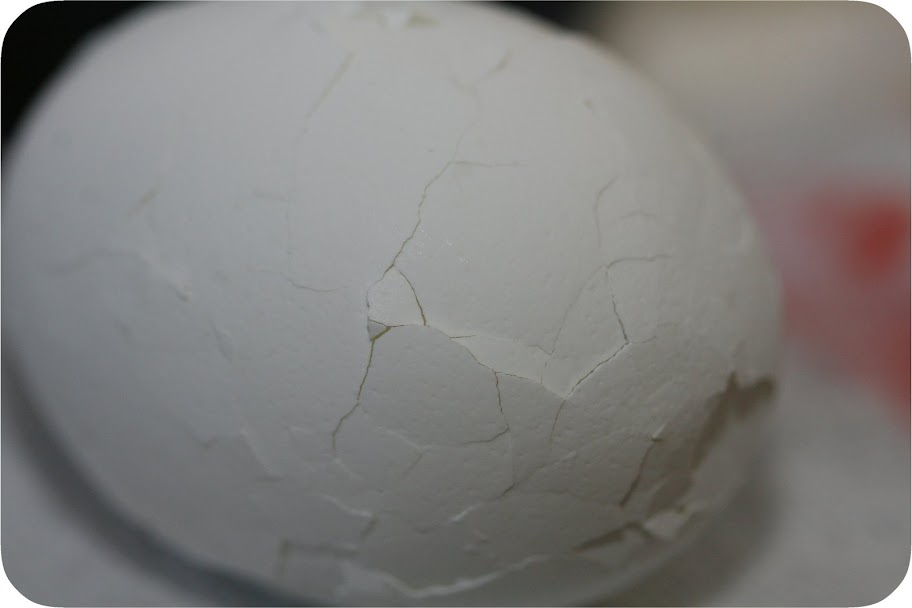

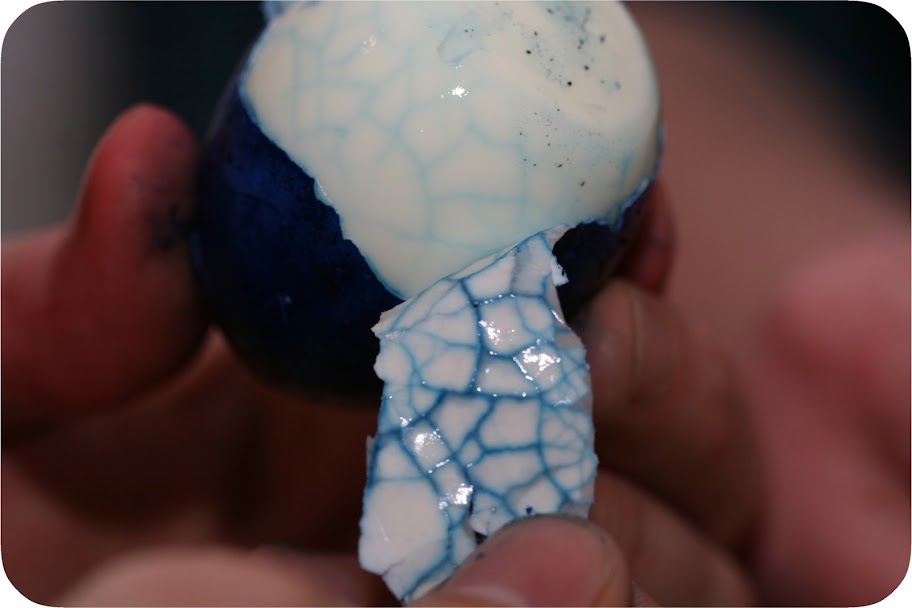
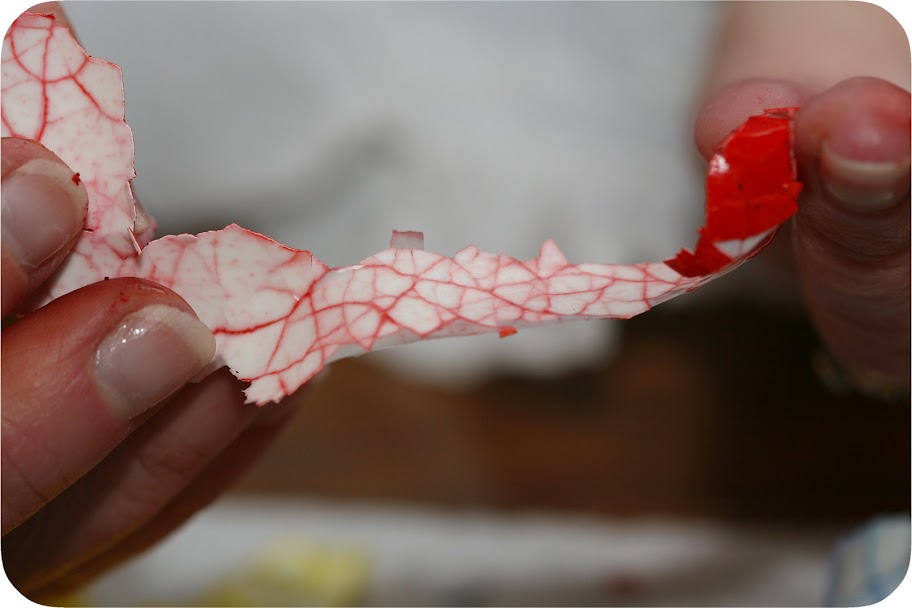
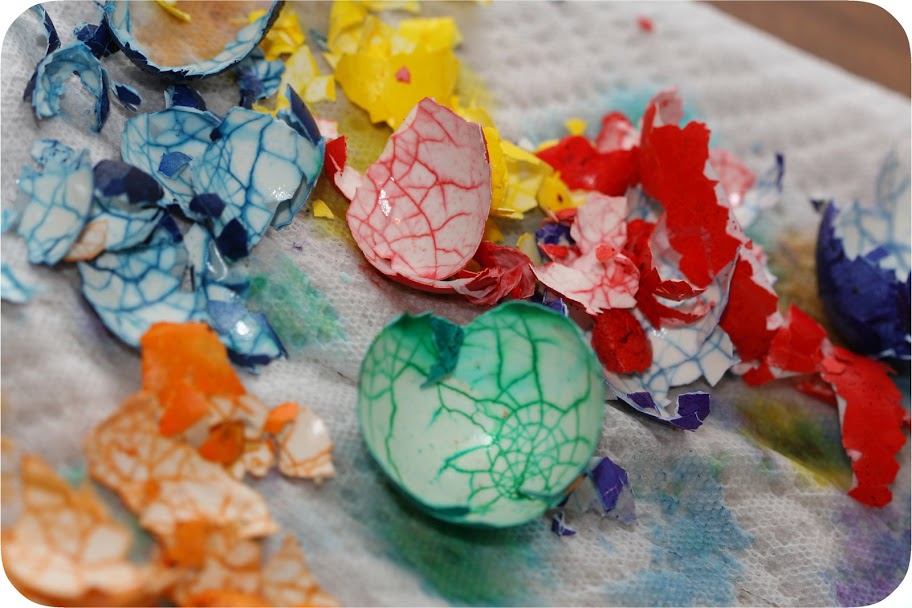
husband and mom carefully peeled the eggs while i snapped pictures. it's not like when you've already dyed them and you're peeling just to eat. this dye job relies on a cleanly peeled, whole and intact egg. and as the peels came off, the designs were revealed. while not as strong as those i've seen on other sites, the crackling was visible from most of the colors. the shells were just as cool.
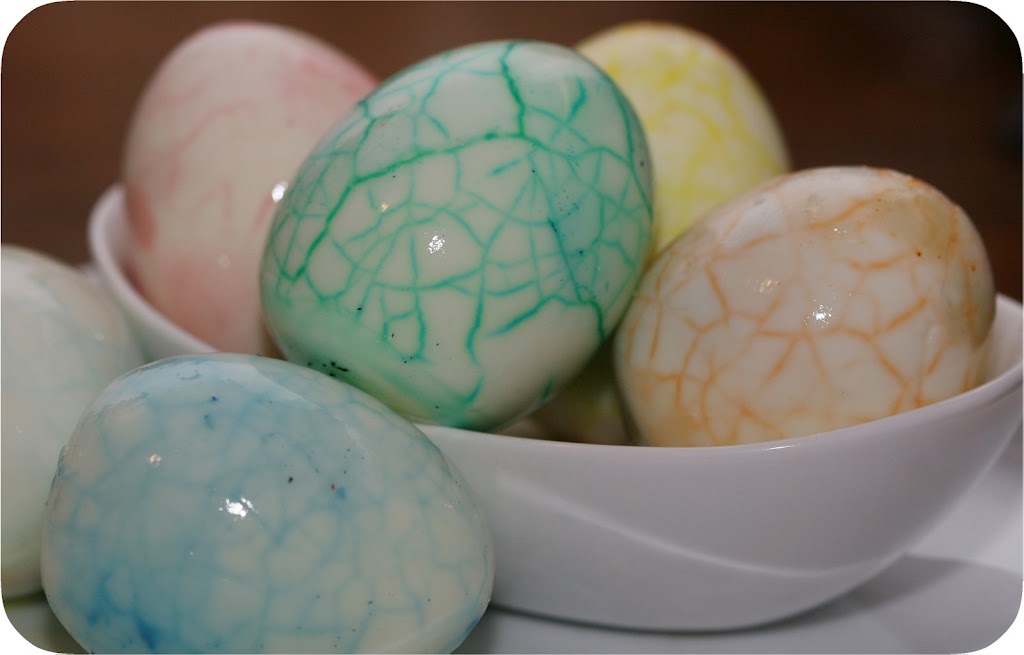
green (husband smashed egg and #1 dye choice) was by far the best, followed closely by yellow and orange, then blue. red beat out purple, which barely showed a crackling (and this my carefully cracked egg!). they weren't nearly as vibrant as i had hoped, probably because 1) they didn't sit in the dye long enough and 2) they weren't well cracked.
i wanted to try this again next year and then i came across this real tie-dyed egg tutorial and now i want to do that, too. can i do both? it seems you can't eat the tie-dyed ones, so it's not like there would be 2 or three dozen eggs to eat...so maybe i will. either way, i've learned that there's more ways than the paas box to make eggs special.
happy easter!
i had in mind this easter to make sugar cookies as i often do for other holidays, but i was feeling lazy and didn't want to refrigerate, roll, cut, and pipe royal icing for hours. i knew i had this new easter egg cutter that i wanted to use but could not think of a cookie fit for spring that i felt up to. then i came across these sugar cookie bars from beantown baker and saw the light. i asked her if she thought these bars were stable enough to be cut into simple shapes (i figure an egg isn't that far off from a square) and she said they were, so it was decided. and with my mother in town, i put her to work in the kitchen with me.
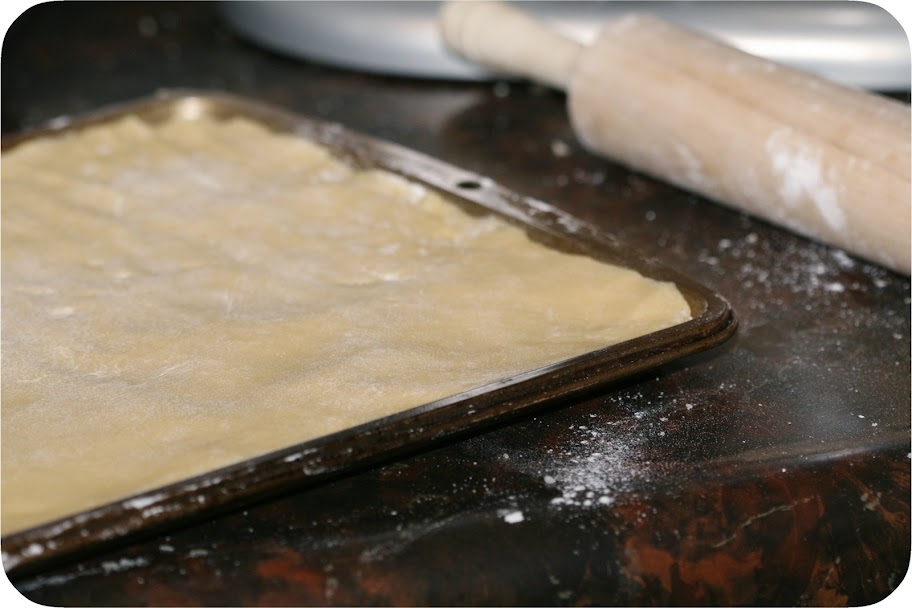
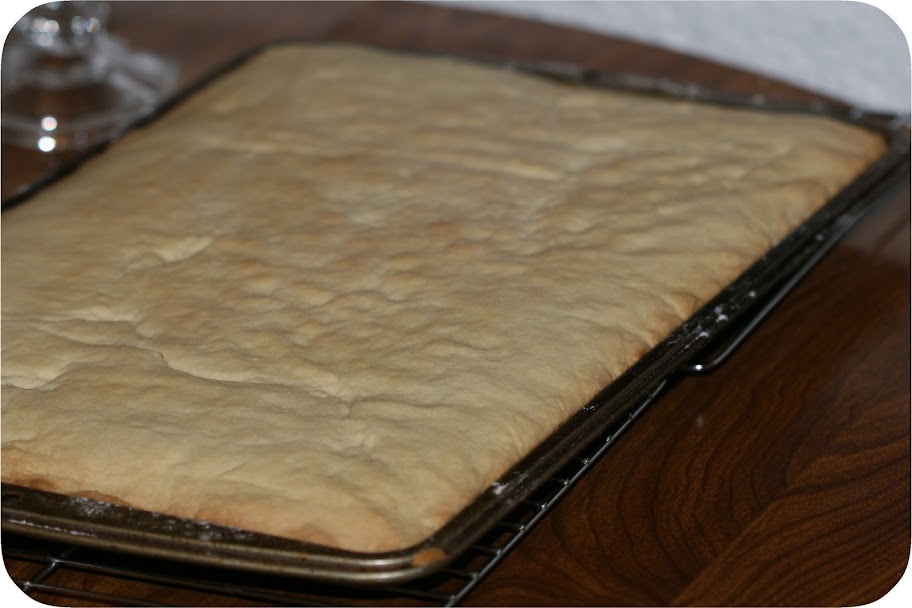
cookie...bar...?
these are a lot like regular sugar cookies at the start. the dough tastes the same and out of the oven, they smell the same. but they're baked in a jelly roll pan and cut after they're done. this results in a thick, cakey "cookie" with layers almost like a good biscuit. and instead of royal icing, you use old fashioned bakery frosting.
sugar cookie bars (from beantown baker)
1 c butter at room temp
2 c sugar
4 eggs
2 tsp vanilla
5 c flour
1 tsp salt
1/2 tsp baking soda
1. cream butter and sugar until fluffy
2. add eggs, one at a time, mixing after each
3. add vanilla & mix well.
4. in a separate bowl combine flour, salt & soda & stir with a whisk to combine
5. add to wet mixture and mix just until combined.
6. spread on a jelly roll pan lined with parchment paper
7. bake for 10-15 min, until light golden brown or until a toothpick comes out clean
8. cool completely before frosting
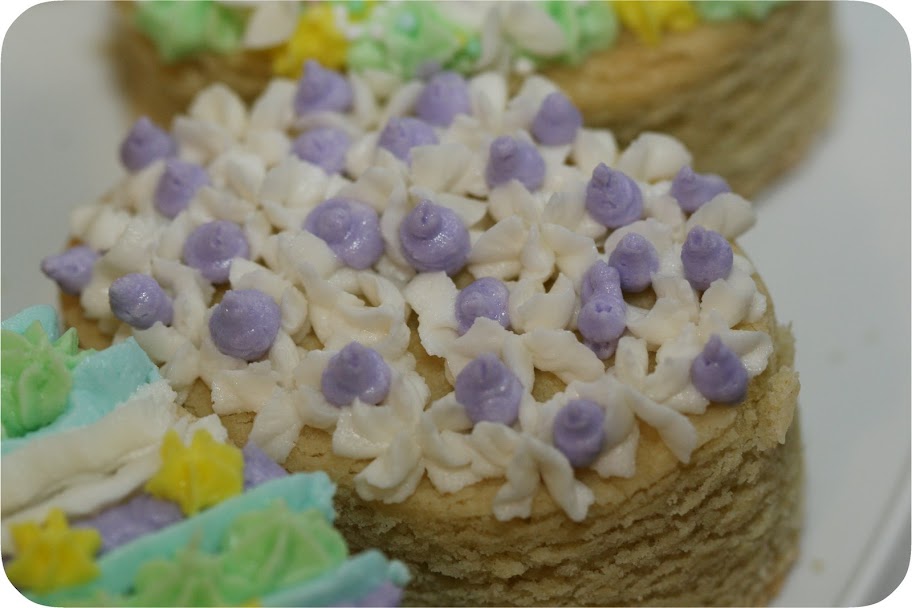
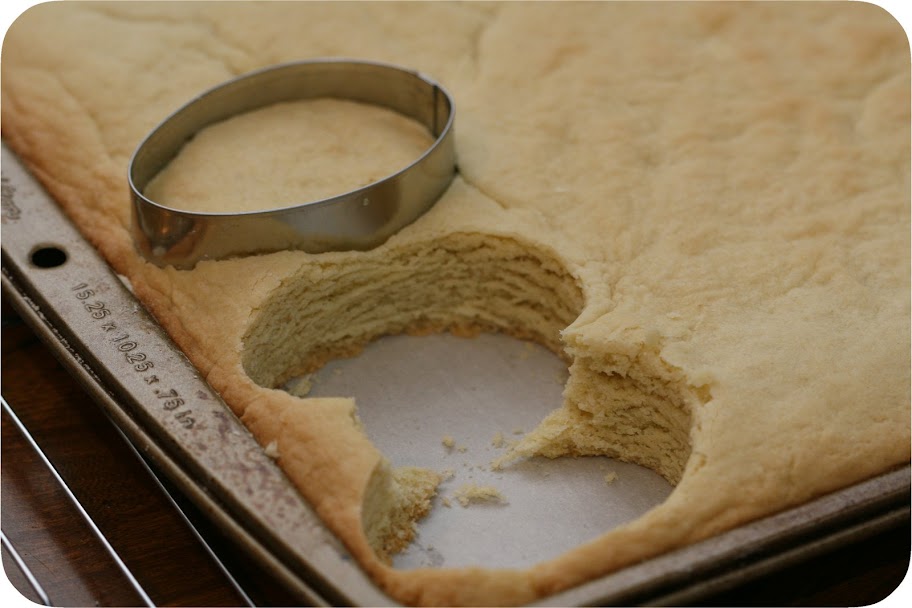
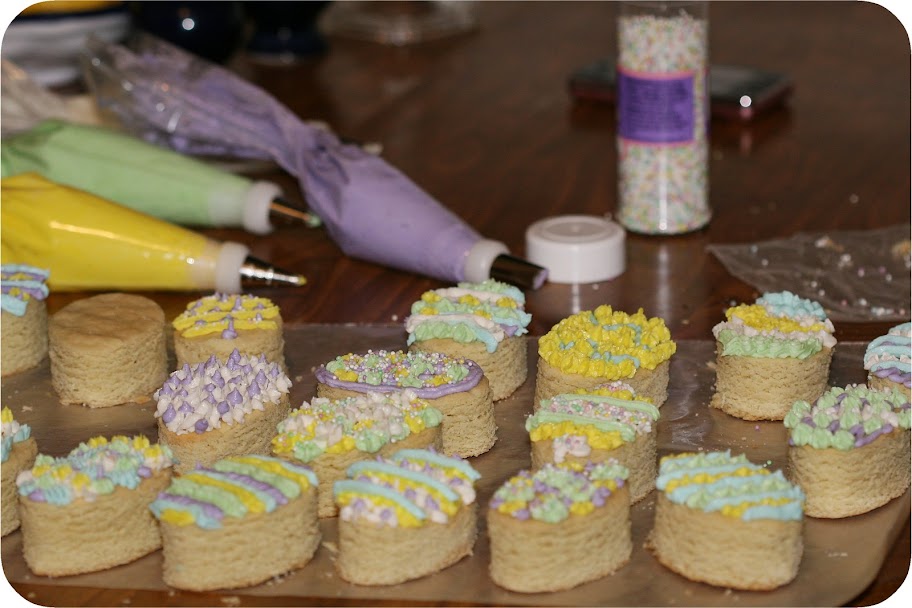
now you could do what she does and frost them right in the pan, but i wanted shapes decorated like easter eggs. so i cut mine out and mom and i piped the frosting with some basic tips.
bakery frosting
1/2 c butter at room temp
1/2 c shortening
1 tsp vanilla
pinch of salt
4 c powdered sugar
5 tbsp milk
food coloring (optional)
1. combine butter and shortening and mix until smooth and creamy
2. add vanilla and salt
3. add powdered sugar in 1-2 cup increments until combined
4. add milk & mix until smooth and spreading/piping consistency
sugar cookie bars (from beantown baker)
1 c butter at room temp
2 c sugar
4 eggs
2 tsp vanilla
5 c flour
1 tsp salt
1/2 tsp baking soda
1. cream butter and sugar until fluffy
2. add eggs, one at a time, mixing after each
3. add vanilla & mix well.
4. in a separate bowl combine flour, salt & soda & stir with a whisk to combine
5. add to wet mixture and mix just until combined.
6. spread on a jelly roll pan lined with parchment paper
7. bake for 10-15 min, until light golden brown or until a toothpick comes out clean
8. cool completely before frosting
now you could do what she does and frost them right in the pan, but i wanted shapes decorated like easter eggs. so i cut mine out and mom and i piped the frosting with some basic tips.
bakery frosting
1/2 c butter at room temp
1/2 c shortening
1 tsp vanilla
pinch of salt
4 c powdered sugar
5 tbsp milk
food coloring (optional)
1. combine butter and shortening and mix until smooth and creamy
2. add vanilla and salt
3. add powdered sugar in 1-2 cup increments until combined
4. add milk & mix until smooth and spreading/piping consistency

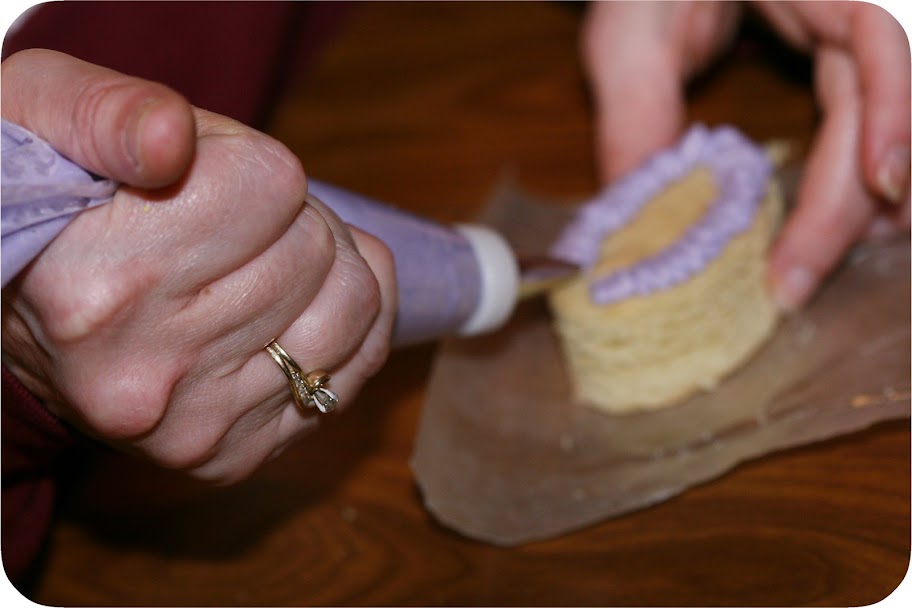
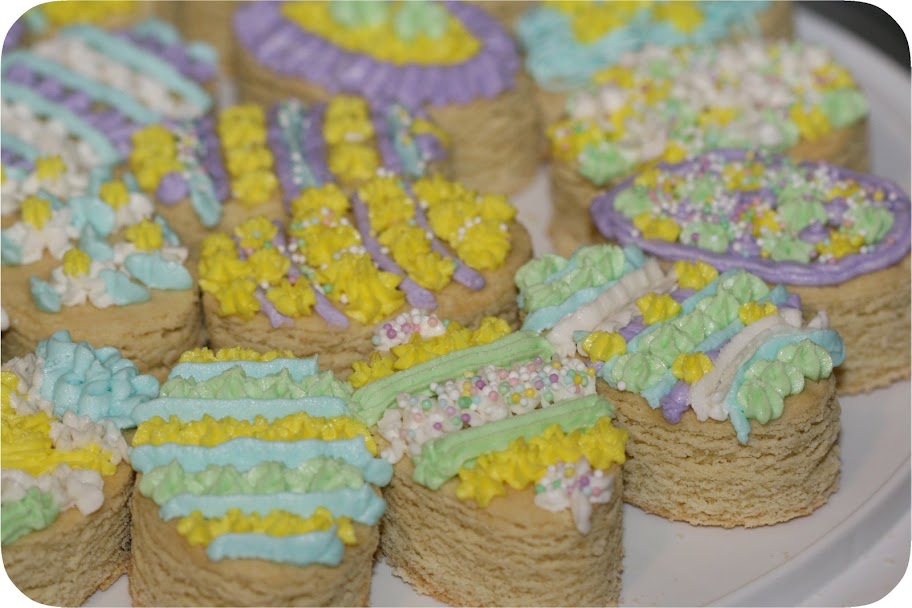
frosting cookie bars
this part was fun. its not quite as easy as slathering the frosting on while the bars are in the pan, but it beats decorating with a knife or piping royal icing and then flooding each part. plus...this tastes so good!
mom was nervous before piping. even though she did all of my birthday cakes growing up and has her own mad skills, she wasn't sure how she'd do with my tips. not three minutes later mom started to pipe, got the hang of it and declared herself "in love with piping". look out coworkers, family, and friends. she has decided this is her calling and you will be receiving trays of hand piped sugar cookie bars for all future occasions.
mom was nervous before piping. even though she did all of my birthday cakes growing up and has her own mad skills, she wasn't sure how she'd do with my tips. not three minutes later mom started to pipe, got the hang of it and declared herself "in love with piping". look out coworkers, family, and friends. she has decided this is her calling and you will be receiving trays of hand piped sugar cookie bars for all future occasions.

frosting with matching sprinkles!
so these were fun, easy, and best of all...they taste excellent! they are definately better with a good coating of frosting, because they are a little on the dry side. i say this because i like a chewy cookie and a super moist cake, and these are neither. but they do satisfy the need for a sugar cookie without all of the hassle, and piped or frosting coated, they remind you of a good bakery cookie (not those weird ones that have whipped air frosting that leaves a curious film in your mouth).
i have yet to note, using a shape cutter does result in some waste. in my case, we ate those first with lots of frosting.
Subscribe to:
Posts (Atom)
