Friday, June 27, 2008

white chocolate-raspberry covered miniature cheesecakes
i've been wanting a mini cheesecake pan for awhile now and finally bought one from king arthur flour. since receiving it in the mail, i've been waiting for an opportunity to make a batch (no, sitting at home watching movies does not count as an "opportunity"). when we were invited to our friends' house for dinner i thought of my lonely, unused pan and offered to bring dessert.

mah brand new mini cheesecake pan
if you haven't seen one of these before, it's just so smart. the pan makes 12 cheesecakes and each spot has a hole and a disc to cover said hole. when they're done, you poke from the bottom of the pan and out pops a perfect, 3 bite piece of cheesecake. the box came with a recipe, but i only half trusted it because it involved a can of cherry pie filling (have i mentioned before that this is disgusting?)...so i went online and found something better.
mini cheesecakes (from bake or break)
6 tbsp butter, melted
1 1/2 cups graham crackers
1/2 cup sugar (divided)
8 oz cream cheese, softened
1 egg
1 tsp vanilla extract
1. pulse graham crackers in a food processor until a fine crumb
2. mix together melted butter, graham cracker crumbs and 1/4 c of sugar
3. press about 1 1/2 tbsp into bottom and sides of a greased mini cheesecake pan (1/2-3/4 up the sides)
4. in a new bowl, mix cream cheese, 1/4 c sugar, egg, and vanilla until blended
5. pour batter on top of crusts and bake at 350F for 12-14 minutes


the crust was a little harder to do than i expected. making it was a breeze, obviously, but trying to pat it up the sides and on the bottom evenly was difficult. when i was pressing, my fingers kept jabbing into already pressed crusts, causing them to crumble back to the middle into loose piles. i gave up on perfection and opted for an appealing roughness to the edges.


the filling was nice and simple, but i thought i didn't have quite enough. even though i scraped the bowl clean to fill the pan, none of the cakes were full. but i was wrong. they puffed up quite nicely and then settled into adorable little cheesecakes once cooled.

see? we turned out just right!

um, could it get any simpler?
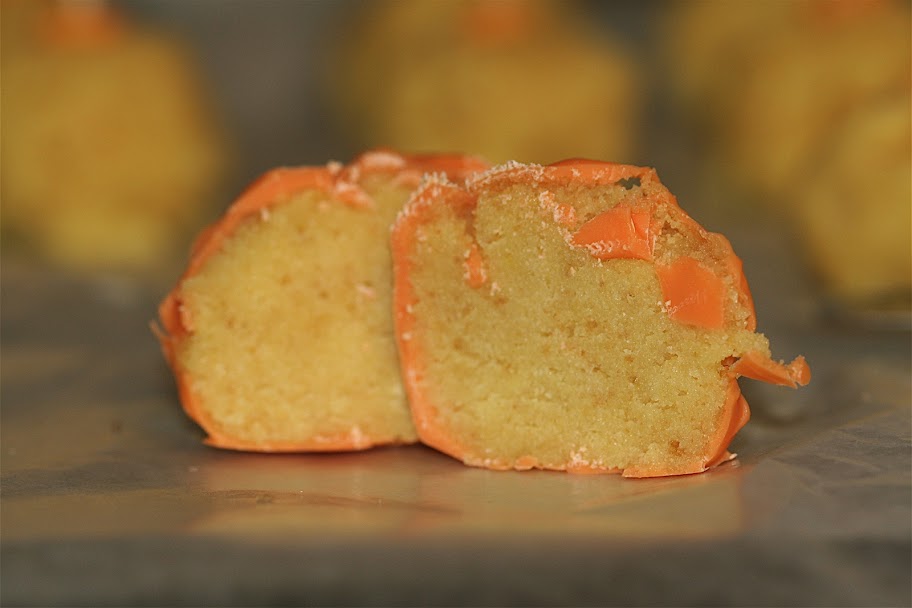
to finish these guys off, i used bake or break's basic white chocolate-raspberry topping. 1 oz melted white chocolate for 1 tbsp raspberry preserves. i made 3 oz/tbsp worth and it was more than enough for 12 cakes. it was quick and easy to "drizzle" (it's not liquid-y, so you have to gently spoon it on) over the top.
topped with some shaved white chocolate, these cuties were perfect for dessert treats.


shiny, sweet glaze over rich, creamy cheesecake!
everyone really loved these and agreed that the cheesecake filling was perfect. it's a great base to top with any number of goodies (husband of course requested chocolate) or to switch up the basic flavor (i was thinking about adding citrus zest). the crust was good, but paired with the white choc-rasp topping, it was sweet overload. i think i may have been a little too generous with the glaze and could have also decreased the sugar by just a tiny bit in the crust.
in all, we agreed that they were great and were mostly just excited to test out new flavor combinations. i'm thinking chocolate crust and turtle topping next time!!
Sunday, June 22, 2008

it's cake on a stick!
as soon as i saw these treats, expertly crafted and beautifully photographed, on bakerella i knew i wanted to make them. she's made these into cupcake pops (featured on martha stewart!) and a variety of themes...for my first time trying them, i went for basic. so basic it's almost embarrassing...
i know i'll make these again (husband requested a chocolate version), but for my trial run i made simple lemon cake (from a box!) and homemade lemon cream cheese frosting. these were for a friend and coworker who is leaving his job for another in boston. he's all about sunshine, so i figured lemon cake and bright candy coating would be a perfect fit.


i don't think my crumble was small enough...next time it will be!
the first part of this is so simple a dachshund could do it. but really not, because a dachshund has no self control and would eat the cake and frosting before it was even mixed. i used the directions from bakerella's red velvet cake balls.
cake balls
1 box cake mix
1 can frosting (or make you own, as i did*)
melting chocolate or candy
lollipop sticks (bamboo skewers in my case)
cake ball assembly
1. make the boxed cake and allow to cool completely
2. crumble the cake finely and blend it with the frosting
3. roll into balls and place on wax paper lined cookie sheets
4. place in fridge for several hours (or freezer, it's faster)
*lemon cream cheese frosting
1 8oz package cream cheese, softened
1 stick unlsalted butter, softened
3 cups powdered sugar
rind of one lemon
juice of one lemon
1. cream butter and cream cheese until smooth
2. beat in lemon rind and powdered sugar
3. add lemon juice, adjust amounts using more or less juice or sugar until desired consistency


assembled balls and pops (omg! what is wrong with the top left size?)
1. melt candy or chocolate until smooth
2. if making pops, dip the end of the stick in melted candy and insert into cake ball, cool
3. for cake balls, dip the cake into the melted candy and roll around, shake off with a spoon and return to wax paper
4. for pops, swirl the cake in the melted candy until coated, allow to drip then place stick in styrofoam


one reason i'm not super proud of these cake balls is because they don't look all that pretty. i started them too late in the evening and wound up finishing after midnight. i had to be up for work the next morning and i was losing patience for things like perfection. but i forged ahead and made some candy suns to affix to a few of the balls and pops. had it been earlier, i might have thought to take some care in free-handing those...but it wasn't earlier and i did these with my sleep mask on.
lemony cake goodness with a candy shell
but it was ok, because these still tasted good and everyone really enjoyed them. i think partly for the novelty factor... no one had seen or had anything like them and i gave the "recipe" to almost everyone that tried one subsequently requested it. i did learn a few things that may or may not have been discussed in one of bakerella's posts about cake balls/pops:
one, the crumb should be fine before mixing in the frosting. like i said above, mine might have had some large cake pieces that i was too lazy to break up.
two, the balls should be small, like truffle sized. mine were a bit too big, so a little less cute and way overloaded on the sweetness per ball.
three, i would play around with frostings and cakes...because i don't use boxed cakes all that often, i had forgotten how sweet they are. the lemon on lemon was good, but it was really too sugary together.
four, the balls have to be really cold before dipping in the melted candy or bits of cake fall off. i had to melt new batches because i kept getting lumpy, cakey melted candy.
five, don't start these if you don't have time for them. they are so fun and cute, but take the time to make them neat. since they aren't hard to do, it's worth it to have them look perfect.

on their way to a party!
Saturday, June 21, 2008

i can haz a break? just barely homemade pizza.
some days, i'm hungry at the grocery store and cannot possibly fathom cooking a multi dish meal upon my return home. at trader joes, this is hardly a problem. there are so many from-a-box, pre-prepped items in that store, you'd have to be blind to walk out without finding something quick and easy to make for dinner. of course, most of those things have 500 million calories per serving and you're bound to eat the whole box without realizing it's for a family of eight.
enter the trader joe's wheat pizza crust, sauce and cheap cheese selection. now i know i've been all it's spring (summer!), must have fresh veggies...but some days, canned and jarred items just really hit the spot. this pizza is the closest to ready made as you can get without actually bringing it home from the store in it's end form. and yeah, it' pizza...but if you control what you put on it and how much you eat, it has got to better for you than taquitos.


there is no recipe. buy pre-made pizza crust (do whole wheat, it's still good and way better for you). buy pizza sauce in a jar or a can...one with spices already added. then pick your toppings. to keep it easy, I chose kalamata olives (husband accidently bought unpitted, so i tore them up for a more organic [visual] feel), jarred sundried tomatoes, jarred roasted red and yellow peppers, and marinated artichoke hearts.
drain all those jarred things, dry them off and chop them up. spread the pizza dough out on a pan and drizzle some olive oil and crushed/chopped garlic on top. pour on some pizza sauce and spread it evenly. throw on your toppings. and my favorite part, arrange large shavings of parmesan and romano cheeses over the top of everything.
put it in the oven and bake at 425F until desired done-ness.

melty cheese
i took pictures and then decided i wanted it to get a little crispier on top. so imagine the cheese more golden. the wheat crust fills you up more than plain old white and these two cheeses are so much more satisfying than that fake frozen pizza "cheese". sure, its not from scratch, but it's quick and easy and tastes so grood! we were so full from just a few slices each, that one pie was enough for dinner and lunch the next day!
Tuesday, June 17, 2008

minneapolis skyline birthday wishes
my sister (in-law) is going to law school this fall and just found an awesome apartment in minneapolis. i made her this birthday card to acknowledge her upcoming move and her special day, all in one.
this is a quick (manual, not live trace) outline i did in illustrator and it's printed on plain white cover. the envelope is hand lined with a matching green paper. there was some bleeding of the black ink on the paper so I'm going to have to get some more high quality paper - i must have run out of the good stuff. and really, i just need to buy a real nice, professional laser for my future endeavors.

those greens matched in person, if i recall...
Saturday, June 14, 2008

it's the bride-to-be and her lollipop buttons!
i'm helping a wonderful friend with her wedding - i'm so excited to be her DOC (day of coordinator); to make sure everything goes smoothly for her rehearsal and the big event. during one of our meetings, she discussed her button "theme" (it's not really her theme, but there are button elements throughout the day) and showed me a picture from martha stewart with button lollipops as decorations and favors. they looked easy enough and i had just heard from a student i work with that he made lollipops during a trip home. i figured if he could do it, we could do it.
i did some preliminary searching, found an online supplier of button candy molds and 'bride a' ordered sticks, bags, and 10 mold sets. we scheduled a june candy factory date and set up shop in her kitchen and dining room.


clear and white plastic molds - white was deeper and easier to fill, but clear made cute, thin pops
on a balmy sunday at noon (it was a billion degrees), we started our adventure into candy land. we carefully coated the molds with butter pam spray (too much, at first), put a stick in each lollipop crevice and got the ingredients ready for our first batch. i had printed notes and tips from online sources and things my friend had mentioned during my quick "training" session...we were so ready for success.
simple lollipop recipe
1/3 c water
1 c sugar
2-3 tsp light corn syrup
few drops liquid food coloring
1. boil water
2. stir in sugar, corn syrup and food coloring
3. stop stirring and boil until hard crack stage or 300F on a candy thermometer (i'll discuss this further down)
4. pour into well greased pyrex measuring cup
5. quickly pour into greased candy molds
6. allow to cool completely before removing, store in plastic wrap or tied candy bags
so we followed steps 1 and 2 and, and since we had no candy thermometer, we used a water testing method to find the hard crack stage. you can find this information anywhere online, but i'll tell you right now, it's a load of crap. the theory is that you drop a bit of the candy liquid into cold water at various cooking points and it will do obvious, easy-to-determine things. examples include forming a tight ball, forming strings from the spoon, and turning solid upon entering the water then cracking if broken (our goal).
yes, it was totally that simple!


round 1: a&a 0, candy 1
we started with yellow. yellow was hard. we tested and tested and it remained gel-like and never formed a ball. we waited. waited for the bubbles in the pot to become tiny, the sign of soft crack stage, just one step before the hard crack stage. but how small is tiny? we waited more. i asked, "do you think it smells like it's burning?" bride a says, "yes..but i think it should, you know? like it burns off and then it's ready." we realize we have no idea what we're doing. we allow it to "burn away" a little more. it becomes darker than yellow, caramel-colored first, then darker still. "take it off!" bride a yells. so i do and we run to to sink with our burned sugar. round one: fail. (don't eat it at this point. bride a literally spit her taste test on the counter and gagged a little.)
it's still early, though, and we're barely sweating. we decide to try again and use purple this time. it's seems luckier. during this round we also get our hands on a brand new candy thermometer that bride a's fiance has purchased especially for this endeavor.

candy thermometer + water testing gives us an advantage. but what stage is this?
so this time we test more often and we've got the candy thermometer telling us the rising temperature. halfway through, bride a's fiance tells us the analog thermometers have a bit of lag compared to digitals and our reading might be off. oh good!
but bride a gets better at testing. while i work over the stove, not stirring but collecting samples at various temperatures, she waits at the water bowl for a specimen. tests 1-5 are usually still in the gel stage. essentially, this means nothing except that it's not even close to ready. the next samples are more pliable. they hold a little bit of shape in the water. between our thermometer's 200-220 marks, we start to get to soft crack stage. the candy sample is like taffy out of water. at 225, our last test point, it makes a pop as it enter the water and audibly snaps when broken. we get that candy off the stove faster than fast.


it's a success! candy to pyrex, pyrex to mold. pouring quickly, two trays are filled per batch. we continue this process 6 times. all purple, 12 trays. it didn't take too long for the candy to cool and they popped easily from the molds. but it was a long process. long and hot and upon finishing 12 trays of purple, we were only half way done.

cute as a button! (i couldn't resist)
so we took a break, studied her ceremony in her air-conditioned bedroom and fiance made us smoothies (so sweet!). fully chilled inside and out, it was onto yellow. but this time, we fared better and had batch after successful batch.


so suck it, yellow...we won. bride a got so good at testing and pouring that i would consider her an expert. i admit that my cooking and lollipop edge clean-up were just as stellar. the a&a lollipop shop is open for business. except not, because whoa it was a long, hot day and i don't want to make lollipops in the foreseeable future.

lollipop, lollipop, oh lolly, lolly, lolly.
120 or so lollipops later, we were finished. we wrapped those babies in plastic wrap and fiance boxed them up for transport to the wedding. we let out a long sigh and i went home and fell asleep.
after doing all of this, i've got some tips:
*don't try double (or more) batches. the liquid will cool down and seize and you'll be unable to pour it.
*use a wooden spoon to stir and test. plastic will melt and metal will burn your hand.
*don't stir once the sugar has dissolved in the water. crystals will form and your candy will not be smooth and glassy.
*don't rely on a specific temperatures or perfect stage results. we never once saw a ball form and didn't reach 300F.
*have plenty of molds. they're cheap and you won't have to wait as long if you're making lots of lollies.
*don't under-boil. we had a batch of opaque lollipops that crumbled when eaten because we didn't reach hard crack.
*don't over-fill the mold. a few of the lollies at the end of the pours spilled over the edge. if you don't clean/remove that before they harden, say goodbye cute button, hello giant circle thingy.
*don't make 120+ lollipops on a humid, 85F day without air-conditioning. you've been warned.

see you cuties in a few weeks!
really, this was pretty easy in the end. the ingredients and supplies are cheap and if you were doing less than we did, it would take just a few hours, start to bagged and bowed finish. these are going to be so cute at her wedding - i'll be sure to take pictures of them all spiffed up on the big day.
Subscribe to:
Posts (Atom)
