
Sunday, June 28, 2009

i designed this card to send my dear grandmother a bit over a week ago. i've been thinking about her everyday since my grandpa passed away in early may and this past week would have been his birthday. she is such a strong, inspirational woman and she's doing well despite challenging times. i'm lucky to have her and i'll send a card any day of the week to tell her that.
the details: i drew the blue swallow in illustrator and added a layer with a blurred fill overlay. i added some simple branch inspired scrolls and an anchor of orange dots which both have basic pattern distressing. the card was printed on heavy white stock with a matching envelope lined in goldenrod.


Thursday, June 25, 2009
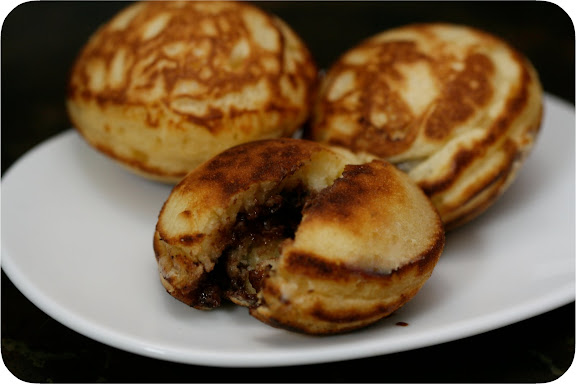
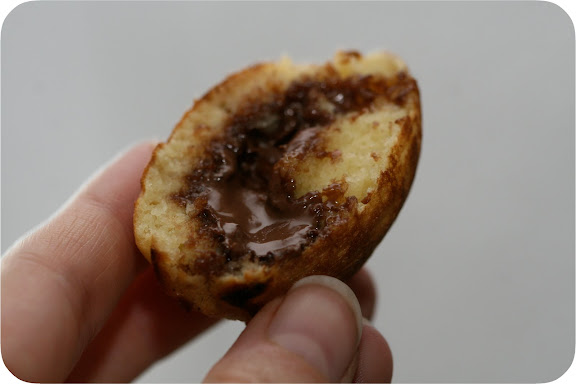
nutella filled ebelskiver
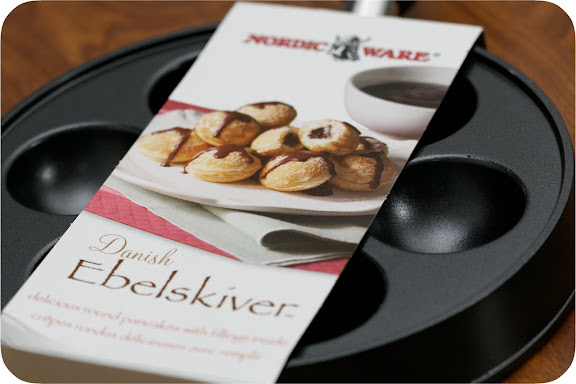
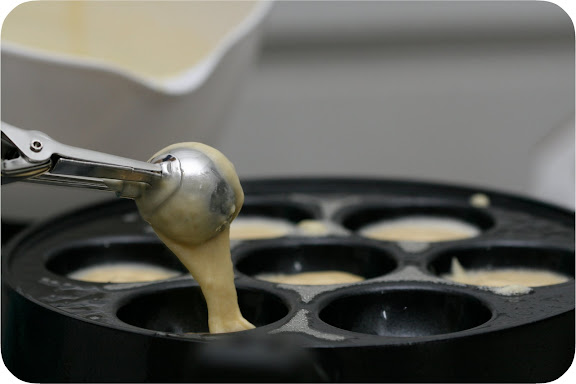
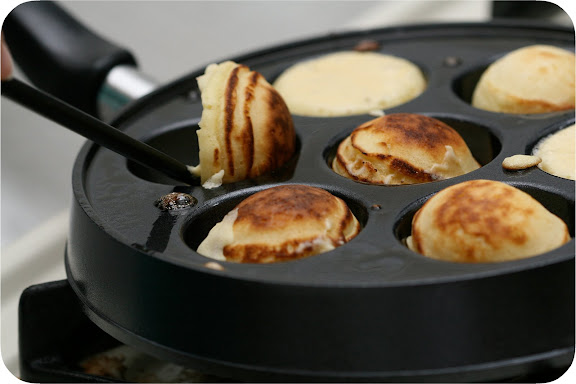
in addition to my ice cream maker, husband also got me a new pan for my birthday in may. i have wanted this pan for a while and once he saw it, i'm sure he was happy to give it to me. buttery, filled, pancake-like balls of goodness can hardly be considered a bad birthday gift for the giver...even if it mean the recipient has to cook.
to go with my ebelskiver pan, he also included the great scandinavian baking book by beatrice ojakangas . it is filled with traditional recipes and i think you must bathe in butter before making any of them. i'm pretty certain it says that in the foreword.
to go with my ebelskiver pan, he also included the great scandinavian baking book by beatrice ojakangas . it is filled with traditional recipes and i think you must bathe in butter before making any of them. i'm pretty certain it says that in the foreword.
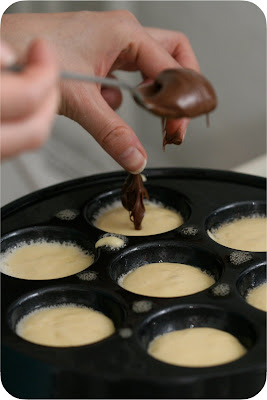
mini muffin scooper for the assist
so if you haven't figured it out, this pan makes something close to little, round pancakes. they are fluffy and light and it's because the batter starts out with whipped egg white folded into the rest of the ingredients. to be honest, i've never made pancake batter from scratch. i hate bisquick, so i use bob's red mill varieties. it might be possible that all homemade from scratch pancake recipes have a meringue-like base, and in that case, they're probably fluffy, too.
where. it's. at.
nutella filled ebelskiver (adapted slightly from the great scandinavian baking book)
1 c milk
1/2 c melted butter
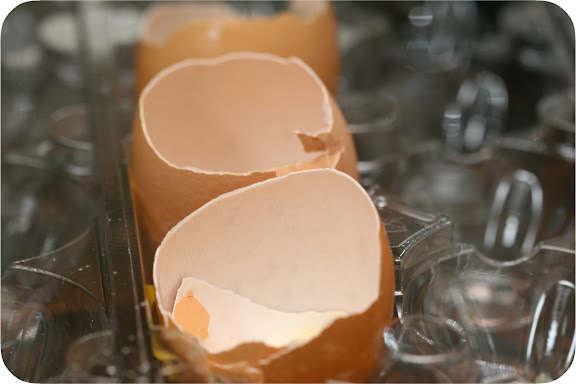
3 eggs, separated
2 tbsp sugar
1 1/2 c all purpose flour
2 tsp baking powder
nutella (amount varies by preference, and by how much you sample while assembling)
1. heat milk to lukewarm
2. whisk in the butter, egg yolks, and sugar
3. turn into a bowl and add the flour and baking powder, whisking until blended and no lumps remain
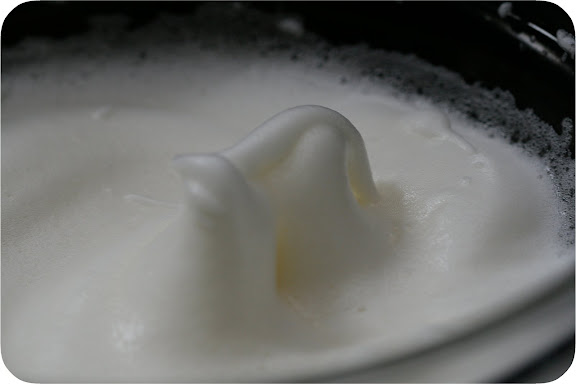
4. whip egg whites until stiff and fold into mixture
5. heat pan over medium high heat until a drop of water sizzles when dripped onto the pan
6. put 1/2 tsp of butter into each indentation (here i used nonstick spray, because that's too much butter)
7. spoon in 1 tablespoon of the batter and let it cook for 30 seconds.
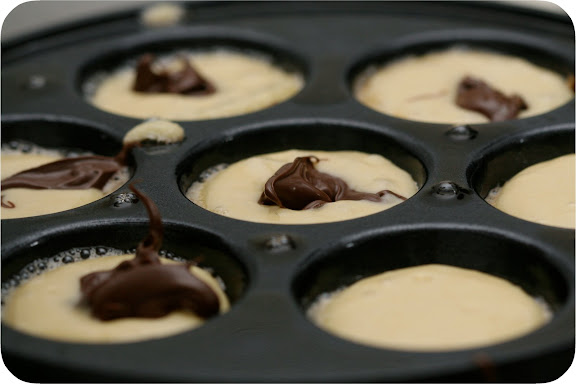
8. drop about 1 teaspoon of nutella into the center and top with more batter to cover
9. when the bottoms are browned, turn the cakes over and cook on that side until browned
10. remove from pan and place on serving plate
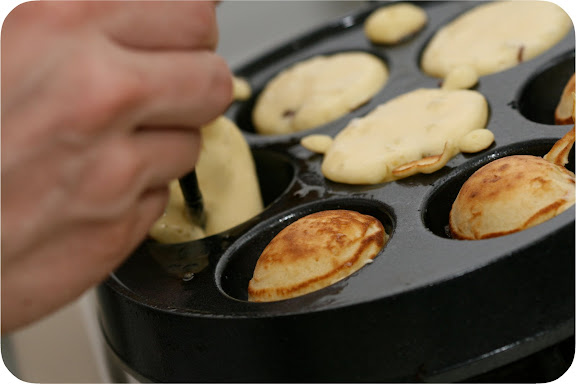
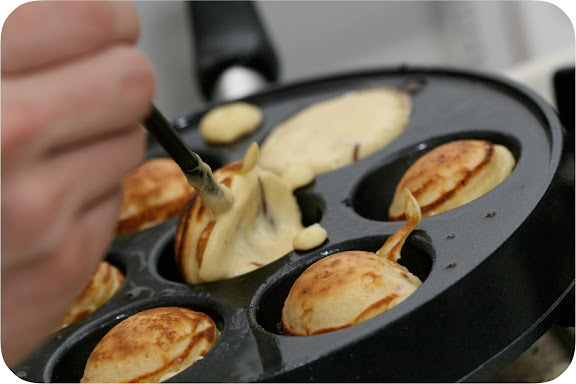
flipping
i made the first batch and at first i was all flustered. hot pan, lots of drippy batter, nutella everywhere. but the pan makes things as simple as can be. we used chopsticks to flip and you cannot mess up because once you turn them, the shape is automatic. husband tried his hand at turning and found it to be easy and fun. i believe he was also more generous with the nutella...surprise, surprise.
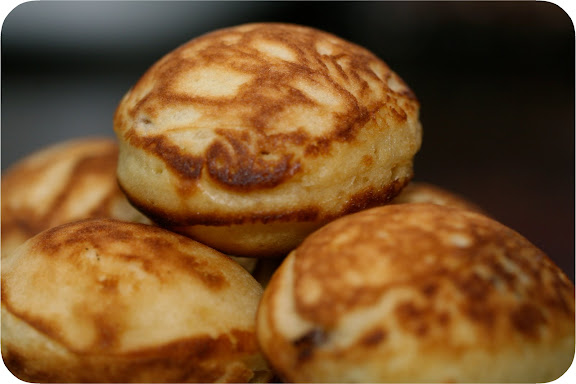
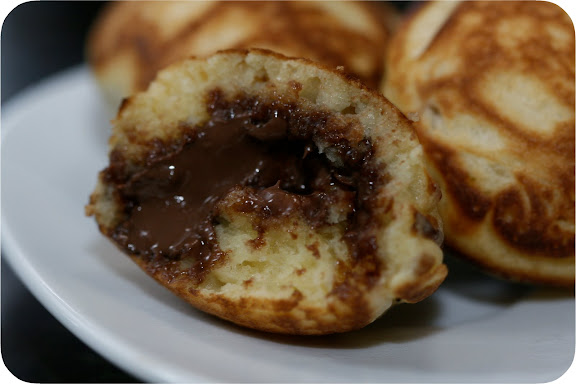
and oh. mah. gah. this "breakfast" turned into lunch and snack. it made 1 million (or 4 batches) and they were irresistible. somewhere about 12 in, husband removed the plate from my general vicinity because i must have been visibly sick looking. tiny, fluffy pancakes filled with the spread of the gods. they needed no syrup, no powdered sugar, no utensils.
i tagged them here as both "real food" and "dessert" because it's hard to choose. i can see them served at a brunch because they're so easy to make and eat. traditionally, you make them with applesauce, which i can see as somewhat appealing. we tried a few with berries and they required a bit more cooking time, but were tasty. i imagined putting a candy bar or a square of caramel filled chocolate inside and then serving with ice cream for dessert. there is no wrong way.
i tagged them here as both "real food" and "dessert" because it's hard to choose. i can see them served at a brunch because they're so easy to make and eat. traditionally, you make them with applesauce, which i can see as somewhat appealing. we tried a few with berries and they required a bit more cooking time, but were tasty. i imagined putting a candy bar or a square of caramel filled chocolate inside and then serving with ice cream for dessert. there is no wrong way.
if this doesn't make you want to rush out and get an ebelskiver pan, then we might have a problem...
Thursday, June 18, 2009

creamy, dreamy orange mango gelato
i love mangoes. i love gelato. i love dreamsicles (we called them that, but they are also known as orange creamsicles). i wanted to combine some of these favorites into one tasty dessert and just happened to come across something along those lines at sweet pea patisserie, adapted from a cooking light recipe.
this might not be true gelato, you can read up on that if you'd like...but it's ice cream with fruit and juice, less milky and thus more like gelato than sorbet or even sherbet.
this might not be true gelato, you can read up on that if you'd like...but it's ice cream with fruit and juice, less milky and thus more like gelato than sorbet or even sherbet.

i have further adapted from the recipe linked above and the one listed below is what i used.
orange mango gelato (adapted from cooking light, via sweet pea patisserie)
1 1/2 c sugar
1 1/2 c water
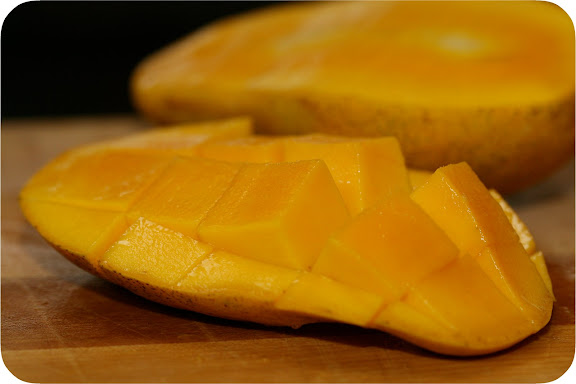
2 ripe mangoes, peeled and cut
1 c orange juice, pulp free or strained
2 c half and half
1. combine water and sugar over medium heat and stir until sugar dissolves to make a simple syrup
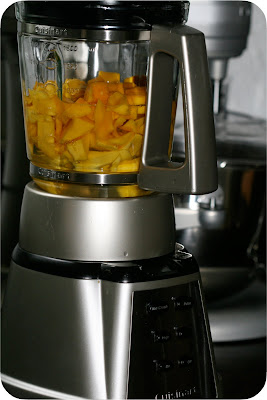
2. combine the slightly cooled syrup and cut mango chunks in a blender and blend until smooth
3. into a large bowl, pour through a sieve to remove pulp
4. add orange juice and half and half and chill for a few hours
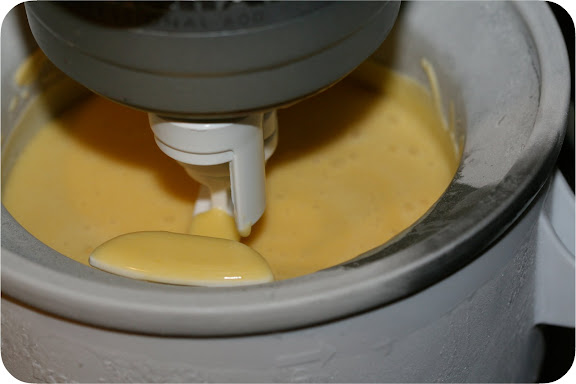
5. pour into ice cream maker and freeze according to manufacturers instructions
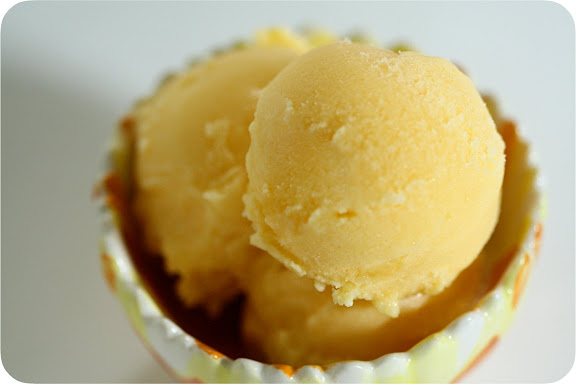

so good. and how adorable is that little bowl/measuring cup from anthro?
this was just as i'd hoped. strong mango flavor, slightly sweet and orangey, nice and creamy. i had tsquared over for one last hurrah and we enjoyed this and world of goo on the wii...it was perfect! even better, it still tasted good the next few days thanks to my freezer safe, air tight storage container. i can't wait until i can fit into my pants again; when i do, i'll start this cycle of making a batch ice cream every week until they (the pants) don't zip anymore. and repeat! thanks, husband, for making my life better yet more difficult, one KA attachment at a time.
Monday, June 15, 2009

it seems like all i do is post about food. where are my crafts? all the fun outside the kitchen? i'm taking time to evaluate that...i miss design and making things with my hands that aren't slimy or sticky... so for now, here are two pictures i took in april at the conservatory.

Wednesday, June 10, 2009

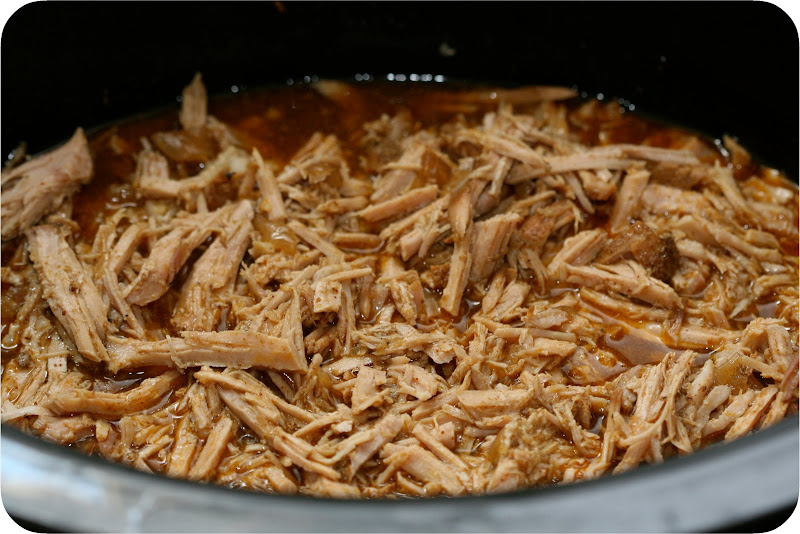
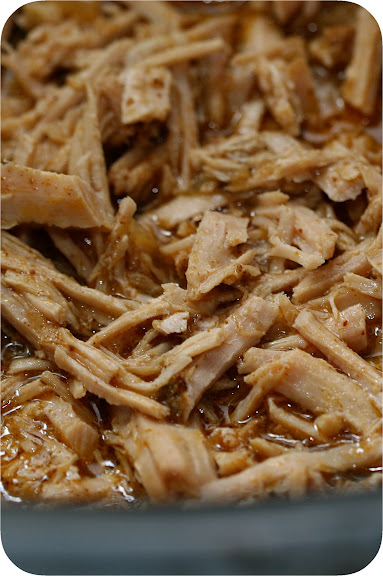
tasty pork tacos
i was reading up on paul's blog about all these tasty mexican foods he was eating and i got a little jealous. you just can't find good mexican food in this city. if you want pierogies, salads or sandwiches with french fries in them, or some good kielbasa, then you'll be happy...mediterranean, italian, indian, thai...it's all here. but fresh pulled pork or real, homemade tortillas? none! and i was craving the real deal. i've been to mexico and have had it, and it's not going be on the drive-thru menu at taco bell (which closed down anyway so i can't even get my late night fix of that).
mmm. go meat. (i love hillshire farms commercials)
being that i am not from mexico and know of no authentic recipes or local resources, i searched online at various sites for one that didn't include beer, rootbeer or a variety of other substances i just couldn't get down with. this is an adaptation of many recipes combined and i am calling it my own.
crockpot carnitas
1 pork tenderloin (no idea how much ours weighed, oopsies...i do know it was a third of whole big one)
1 medium sliced onion
2 cloves garlic cut into quarters
3-4 c chicken broth (depending on size of meat)
2 tbsp cumin
1 tbsp chili powder
1 tbsp lime juice
salt and pepper
1. rub pork with dry spices
2. make a bed of onions and garlic on the bottom of the crockpot and put pork on top
3. pour in chicken broth and lime juice
4. add pepper and a generous amount of salt
5. cook on low for 8 hours (if it looks dry, add a bit more liquid)
6. when tender, use two forks to pull apart
(i ended up adding a little more salt after i pulled it because i like it juicy and salty)
must-have accompaniments
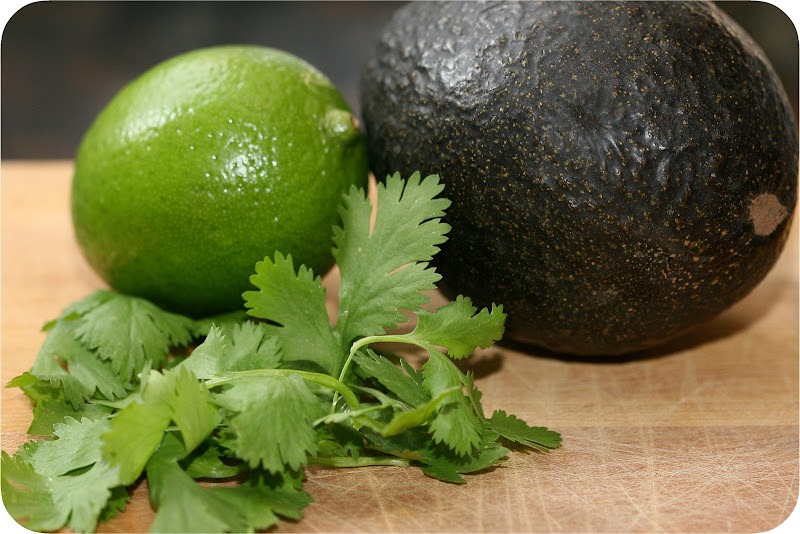
we used small corn tortillas (store bought, but so much better than wheat), lime wedges, avocado, and cilantro for one dinner...then switched it up with cheese, tomatoes, and avocado another day. this makes a good amount of meat and we were able to eat many plates of tacos before we polished it off a few days later. 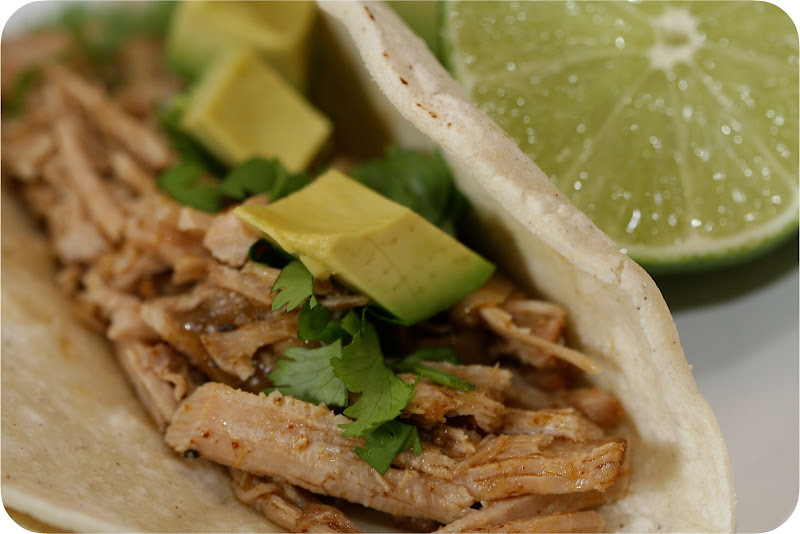
extreme closeup
omg. i could eat this everyday for the rest of my life. so easy (husband prepped this in the morning while i was at work and i finished it when i came home), smells amazing, and tastes even better. it's very versatile and good for crowds (bulk meat is cheaper!). it was even better day two when the meat had a chance to sit overnight in its juices. i wish i had better pictures (they were all so blurry, sorry!), but just thinking about it makes me...mmm...i want to go to there.
Thursday, June 4, 2009
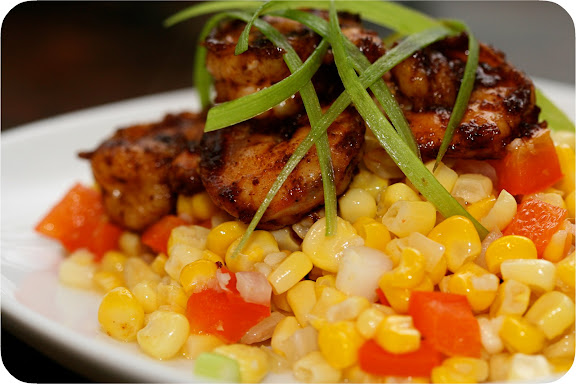
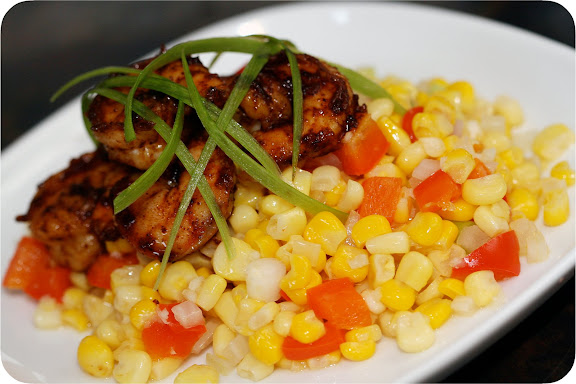
spicy, caramelized shrimp atop a sweet corn relish
in my quest to eat better for summer, healthier and with "purpose" (like, planning a meal or two in advance in my spare time), i browsed a bit online for new recipes. my go-to for quick, easy meals is cooking light. i used to get the magazine and loved paging through it every month, flagging a recipe on every few pages. it's not that they have the most flavorful, best recipes out there, but they do a pretty good job of providing healthy alternatives and recipes that don't require too many ingredients. that's nice when i don't feel like spending an arm and a leg on a wide variety of groceries but i want more than cereal or pasta for dinner.


this simple recipe for three-chile shrimp and corn relish was just the ticket. we already had a large bag of frozen, raw shrimp, which is pretty much a staple in our house, as well as most of the pantry ingredients. the only thing i switched was the chipotle chile powder...for $8 a jar, i'll stick with my other two chile powders, thankyouverymuch. i subbed cumin in because i love it and i had it on hand.
three-chile shrimp and corn relish (cooking light)
3 1/2 tsp sugar, divided
2 tsp chili powder
1 tsp ancho chile powder
1/4 tsp chipotle chile powder (here i used 1 tsp cumin)
1/2 tsp salt, divided
1 1/2 lbs peeled and deveined shrimp
5 tsp olive oil, divided
1/2 c chopped onion
1/2 c chopped red bell pepper
2 tsp minced garlic
2 tsp minced ginger
1 (10-ounce) package frozen corn
1 1/2 tbsp cider vinegar
1/2 c chopped green onions
1. combine 2 tsp sugar, spices, and 1/4 tsp salt and add shrimp to spice mixture; toss to coat
2. heat 1 tbsp oil in a large nonstick skillet over medium-high heat
3. add onion, bell pepper, garlic, and ginger to pan and sauté 3 minutes
4. add remaining 1 1/2 tsp sugar and corn to pan and cook 3 minutes, stirring occasionally
5. stir in vinegar and cook 30 seconds
6. transfer corn mixture to a bowl, stir in remaining 1/4 tsp salt and green onions
7. wipe pan with a paper towel and heat remaining 2 tsp oil in pan over medium-high heat
8. add shrimp to pan and sauté 3 minutes or until done, turning once
9. serve over corn relish
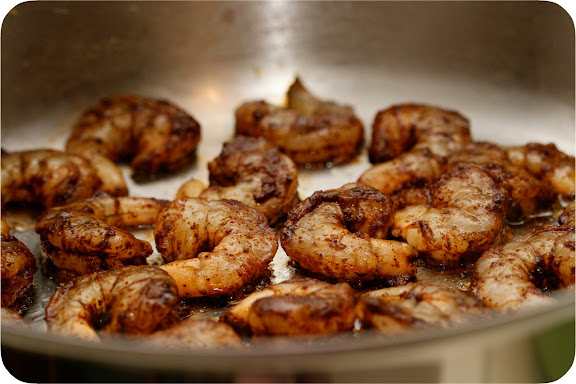
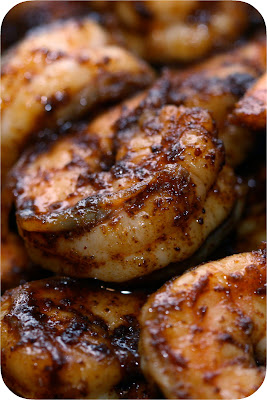
sizzling shrimps
such a nice change from always having a starchy side (and yes, i know what corn is) paired with protein...this was light and fresh. the shrimp was just spicy enough and had caramelized from the sugar. this may be because i used cumin in placed of the third chile powder, but either way it was just right. the corn relish was sweet and tangy, perfect for summer. i imagine the shrimp would be great on skewers over the grill and the relish can be served warm, room temperature, or even cold. delicious!
yum-ski!
Monday, June 1, 2009
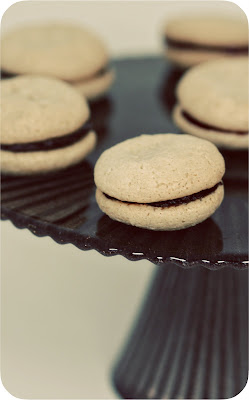
who knew PW's 70s action worked for cookies?
if i were to decide to move in with someone, not my husband, and take my friend-la helen along, i know where we would both go. to the tiny (i guess?) kitchen of the smitten variety. i believe helen has made 4 smitten kitchen recipes in the last week, and i've made my share over the course of the year as well. you just can't resist her delicious photos and recipes. i doubt this plug will be much of a traffic push for her because she gets 1000 comments a day it seems, but yeah, here's my tiny blog shout out to the SK :)


the simple process from start to almost finish
on to cookies. i saw these cookies a few months ago and decided that when my mom visited (yes, also a few months ago), we would make them together. i've never made a piped cookie and i have no reason to go gluten free (and, to be technical, my almond paste was not gluten free), but the short list of ingredients and the adorableness that is small sandwich cookies seemed like reason enough.they really were a cinch to put together. i've linked the recipe above, but the pictures pretty much show how everything works. i piped and mom tamped down each little curl to make flat, even cookies. they were good straight out of the oven, just like that.
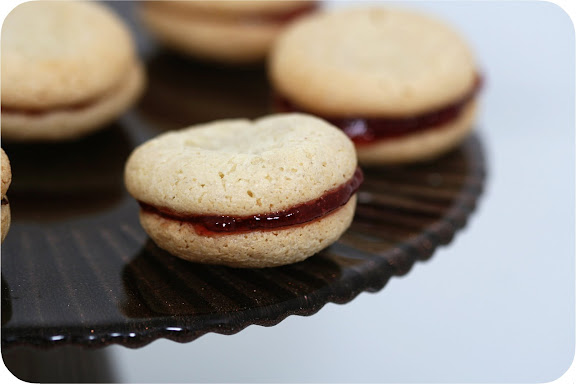

but the finishing touch is filling the cookies. mom and i did raspberry preserves and chocolate ganache. some were all raspberry, some were all chocolate, and then, to be daring, we took a cookie with raspberry and sandwiched it with a chocolate covered cookie. the ultimate chewy, fruity, chocolaty cookie sandwich.
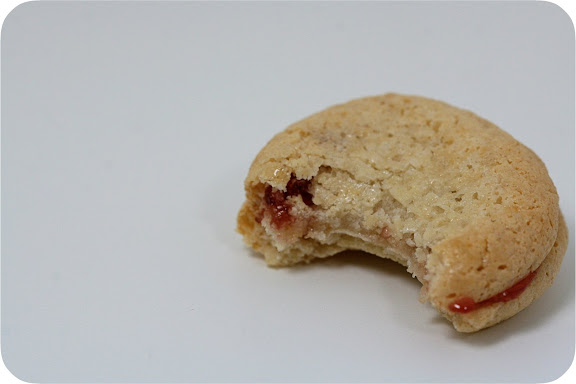
oopsies...i ate this one.
they were so tasty! chewy indeed, with amazing almond flavor. i brought them to work and people polished off the whole bag in under an hour. i don't like marzipan (i once was fooled by an adorable piece of miniature candy fruit, i took one bite and gagged it down...but blegh, did.not.want.), but these have a light texture with a flavor even marzipan haters can enjoy.
Subscribe to:
Posts (Atom)
